Airflow Workflow Guide
Workflow Engine is the core component of the Data Platform, allowing users to define, manage, and execute data processing workflows. Each workflow consists of multiple interdependent tasks, modeled as a DAG (Directed Acyclic Graph).
This guide will help you:
-
Access and manage the workflow list
-
Create and configure workflows
-
Set up tasks of various types (Python, PySpark, Jar, DBT, Dask)
-
Configure schedules and notifications
-
Manage and delete workflows
1. Access Workflow Engine
To access the Workflow Engine, follow these steps:
Step 1: In the main menu bar of Data Platform, select Workflow Engine
Step 2: A dropdown menu displays 2 options:
-
Jobs: Manage the workflow list
-
Notifications: Configure notification channels (Email, Telegram)
Step 3: Select Jobs to access the workflow list
2. Workflow List
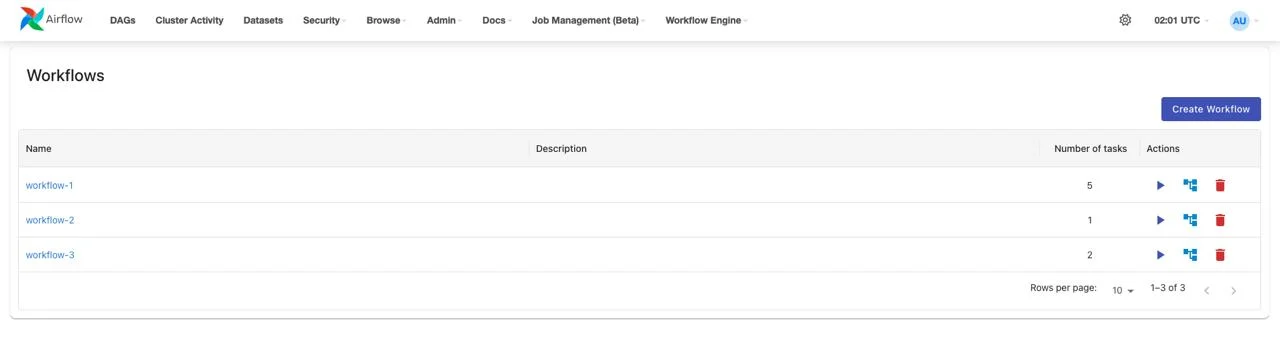
The workflow list interface displays all workflows in the system with an overview of key information.
Main Functions
| Function | Description |
|---|---|
| Create Workflow | Create a new workflow |
| Trigger workflow | Manually trigger a workflow run |
| View graph | View workflow details and run history |
| Delete workflow | Delete a workflow from the system |
| Sort | Sort the list by Name, Description, Number of tasks (ascending/descending) |
| Filter | Filter results by conditions: contains, equals, starts with, ends with, is empty, is any of |
| Hide column | Hide unnecessary columns |
| Manage columns | Customize displayed columns in the list |
| Rows per page | Select the number of workflows per page (10, 25, 50) |
Displayed Information
Each workflow in the list shows the following information:
-
Name: Workflow name (click to view details)
-
Description: Brief description of the workflow
-
Number of tasks: Number of tasks in the workflow
-
Actions: Quick actions (Run, View graph, Delete)
3. Create New Workflow
Initialize Workflow
Step 1: On the workflow list interface, click the Create Workflow button
Step 2: The system automatically initializes a workflow with default information:
-
Workflow ID: Auto-generated in ascending order (unique in the system)
-
Workflow name: Auto-generated following the pattern workflow- + 8 random characters (letters and numbers)
-
Description: Empty (can be added later)
-
Tag: Empty (can be added later)
-
Schedule: Default is "Manual trigger"
Step 3: The system displays a notification:
-
Subject: Success
-
Message: Workflow initialized successfully!
Step 4: Proceed to the workflow detail interface to configure tasks
Workflow Detail Interface
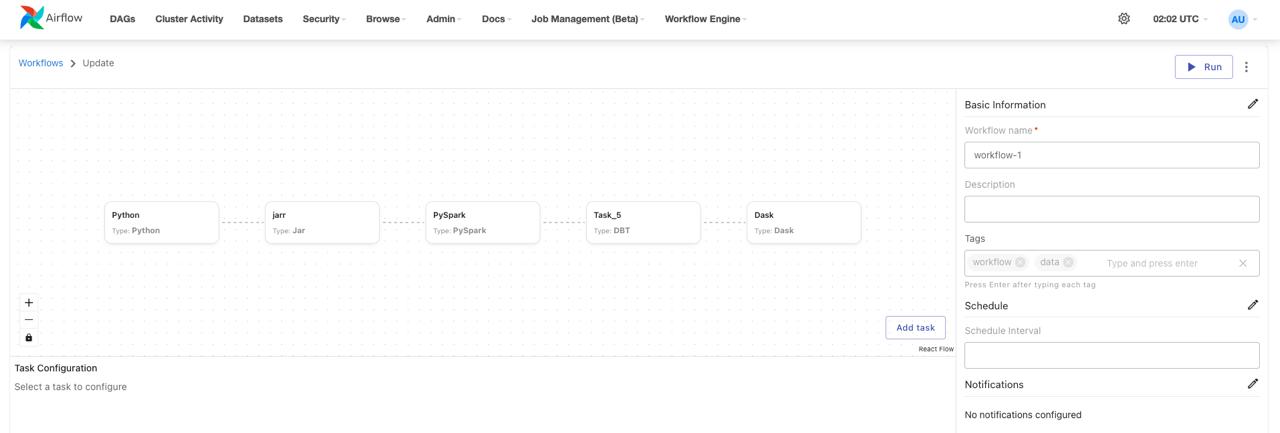
The workflow detail interface consists of 2 main sections:
Section 1: Graph View area (left side)
-
Displays the DAG diagram of tasks
-
Allows zoom in/zoom out to view details
-
Click on a task to view or edit its configuration
-
Add task button to add new tasks
Section 2: Information area (right side)
-
Basic Information: Name, description, tags of the workflow
-
Schedule: Automatic run schedule
-
Notifications: Notification configuration when workflow runs
Function Buttons
| Button | Function |
|---|---|
| Run | Trigger the workflow to run immediately |
| History | View the run history of the workflow |
| Delete | Delete the workflow and all associated data |
| Zoom in | Zoom in on the graph view |
| Zoom out | Zoom out on the graph view |
| Add task | Add a new task to the workflow |
4. Configure Tasks
Workflow Engine supports 5 different task types, each suited for a specific processing purpose.
Add a New Task to Workflow
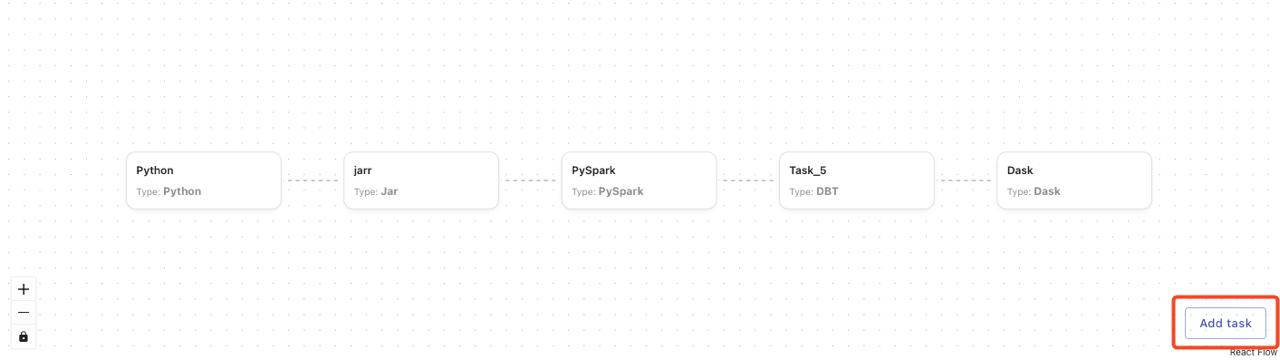
Step 1: On the workflow detail interface, find the Add task button on the Graph View
Step 2: Click the Add task button
Step 3: The system displays a task configuration form at the bottom with the default Type set to "Python"
Step 4: Select the appropriate task type from the Type dropdown:
-
Python: Simple Python script
-
PySpark: Spark job written in Python
-
Jar: Packaged Java/Scala application
-
DBT: DBT (Data Build Tool) project
-
Dask: Dask distributed computing job
Step 5: The configuration form will change according to the selected task type
Step 6: Fill in all required fields (see details for each task type below)
Step 7: Click Save Task to save the configuration
Step 8: The new task will appear on the Graph View
Note:
- If the current task form is in editing state and has not been saved, clicking Add task will display a warning:
o Subject: Warning
o Message: Please save the current task before creating a new one
-
New tasks will have no default dependencies; configure the "Depends on" section if you want the task to run after other tasks
-
Multiple tasks can be added to a workflow with no limit on the number
Task Type: Python
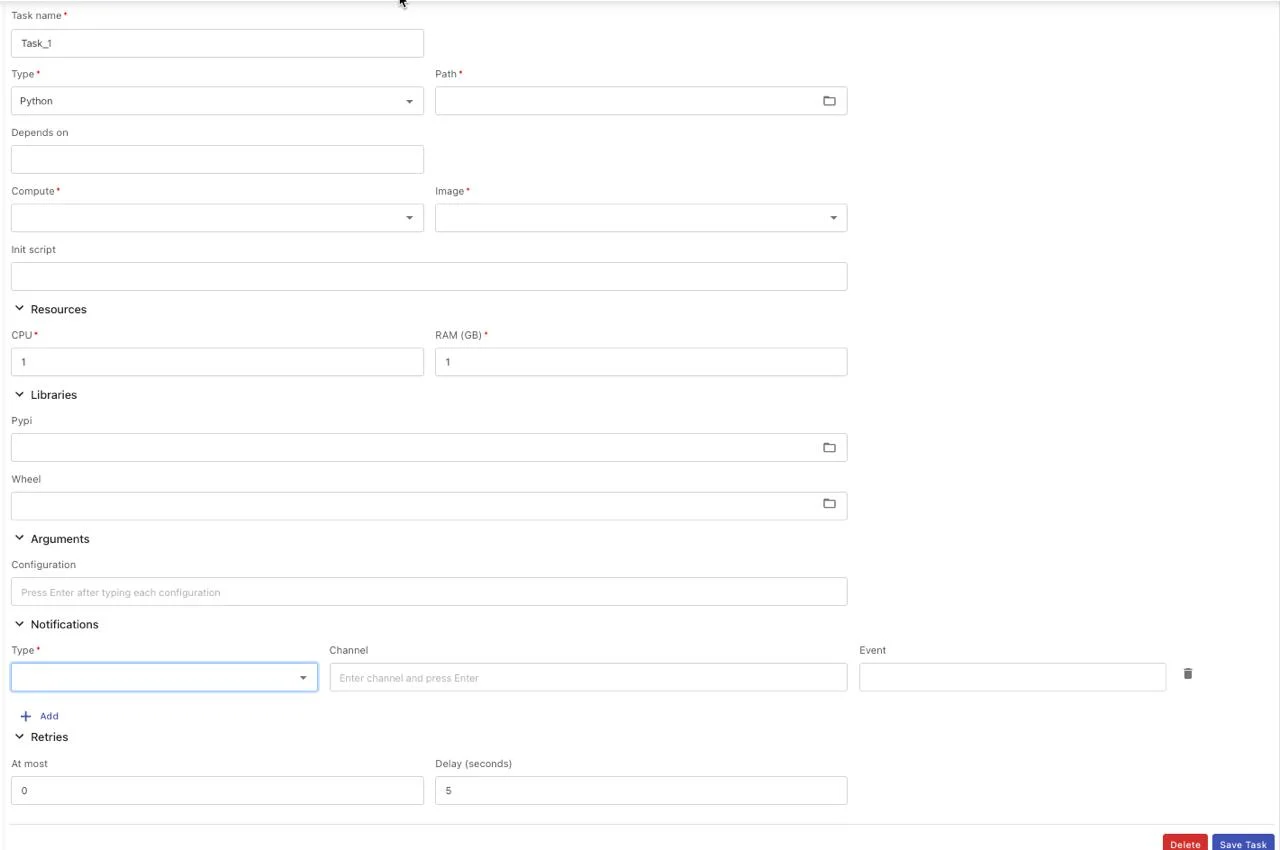
The Python task allows executing simple Python scripts, suitable for small data processing tasks, automation scripts, or simple business logic.
Configuration Fields
Basic Information:
-
Task name (required): Task name — letters, numbers, underscores (_), hyphens (-) only, maximum 100 characters
-
Type (required): Select "Python" from the dropdown list
-
Path (required): Select the Python file path (*.py) from the directory
-
Depends on: Select tasks that this task depends on (multiple selections allowed)
-
Trigger rule: Rule for triggering the task based on the status of upstream tasks
Execution Environment:
- Compute (required):
o Select the Compute to execute the script
o Select from the compute list in Processing service
o Single selection only
- Image (required): Select the appropriate runtime image:
o Python Spark 3.4.2
o Spark 3.5.0 with Python 3.10
o DBT Core 1.9
o Spark 3.5.0 with Python3 for Openmetadata with Lakehouse
o RAPIDS Spark GPU Accelerated
o Python Dask 2025.4.1 (Beta)
- Init scripts: Script executed before running the Python script (optional)
Resources:
-
CPU (required): Number of CPU cores (Min: 1, Max: 64)
-
RAM (GB) (required): RAM capacity (Min: 1, Max: 128)
Libraries:
-
Pypi: requirements.txt file containing the list of Python libraries to install
-
Wheel: .whl files (multiple files can be selected)
Arguments:
- Arguments: Parameters passed when executing the script (maximum 255 characters)
Notifications:
-
Type: Select notification type (Telegram or Email)
-
Channel: Telegram channel or email address to receive notifications (5-254 characters, valid email format)
-
Event: Select the status to send notifications (running, success, failed) — multiple selections allowed
Retry Policy:
-
At most (required): Number of retries when the script fails (Min: 0, Max: 10)
-
Delay (required): Wait time between retries, in minutes (Min: 1, Max: 10)
Trigger Rules
| Trigger Rule | Description |
|---|---|
| all_success | Task runs only when all upstream tasks succeed |
| all_failed | Task runs only when all upstream tasks have FAILED |
| all_done | Task runs when all upstream tasks have finished (in any state: success, failed, skipped) |
| all_done_setup_success | Task runs only when all upstream tasks have finished and all SETUP tasks succeeded |
| one_success | Task runs if at least one upstream task is SUCCESS |
| one_fail | Task runs if at least one upstream task has FAILED |
| one_done | Task runs if at least one upstream task is DONE (finished, regardless of state) |
| none_failed | Task runs when no upstream tasks have FAILED, but some may be SKIPPED |
| none_failed_or_skipped | Task runs when there are no FAILED and no SKIPPED tasks. Only accepts SUCCESS |
| none_skipped | Task runs when no upstream tasks are SKIPPED. Can be FAILED or SUCCESS |
| dummy | Performs no action. Always runs regardless of whether previous tasks succeeded, failed, or were skipped |
| always | Task always runs regardless of upstream status |
| none_failed_min_one_success | Task runs when there are no FAILED tasks and at least one SUCCESS task |
| all_skipped | Task runs when all upstream tasks are SKIPPED |
Steps
Step 1: On the workflow detail interface, click the Add task button
Step 2: The system displays the task configuration form with the default Type set to "Python"
Step 3: Fill in all required fields:
-
Task name
-
Path to the Python file
-
Compute cluster
-
Runtime image
-
CPU and RAM
Step 4: (Optional) Configure additionally:
-
Dependencies (Depends on)
-
Trigger rule
-
Init scripts
-
Libraries (Pypi, Wheel)
-
Arguments
-
Notifications
-
Retry policy
Step 5: Click the Save Task button
Step 6: The system displays a notification:
-
Subject: Success
-
Message: {{task_name}} created successfully!
Step 7: The new task appears on the Graph View
Task Type: PySpark
PySpark tasks allow executing Spark jobs written in Python, suitable for large-scale data processing with distributed computing.
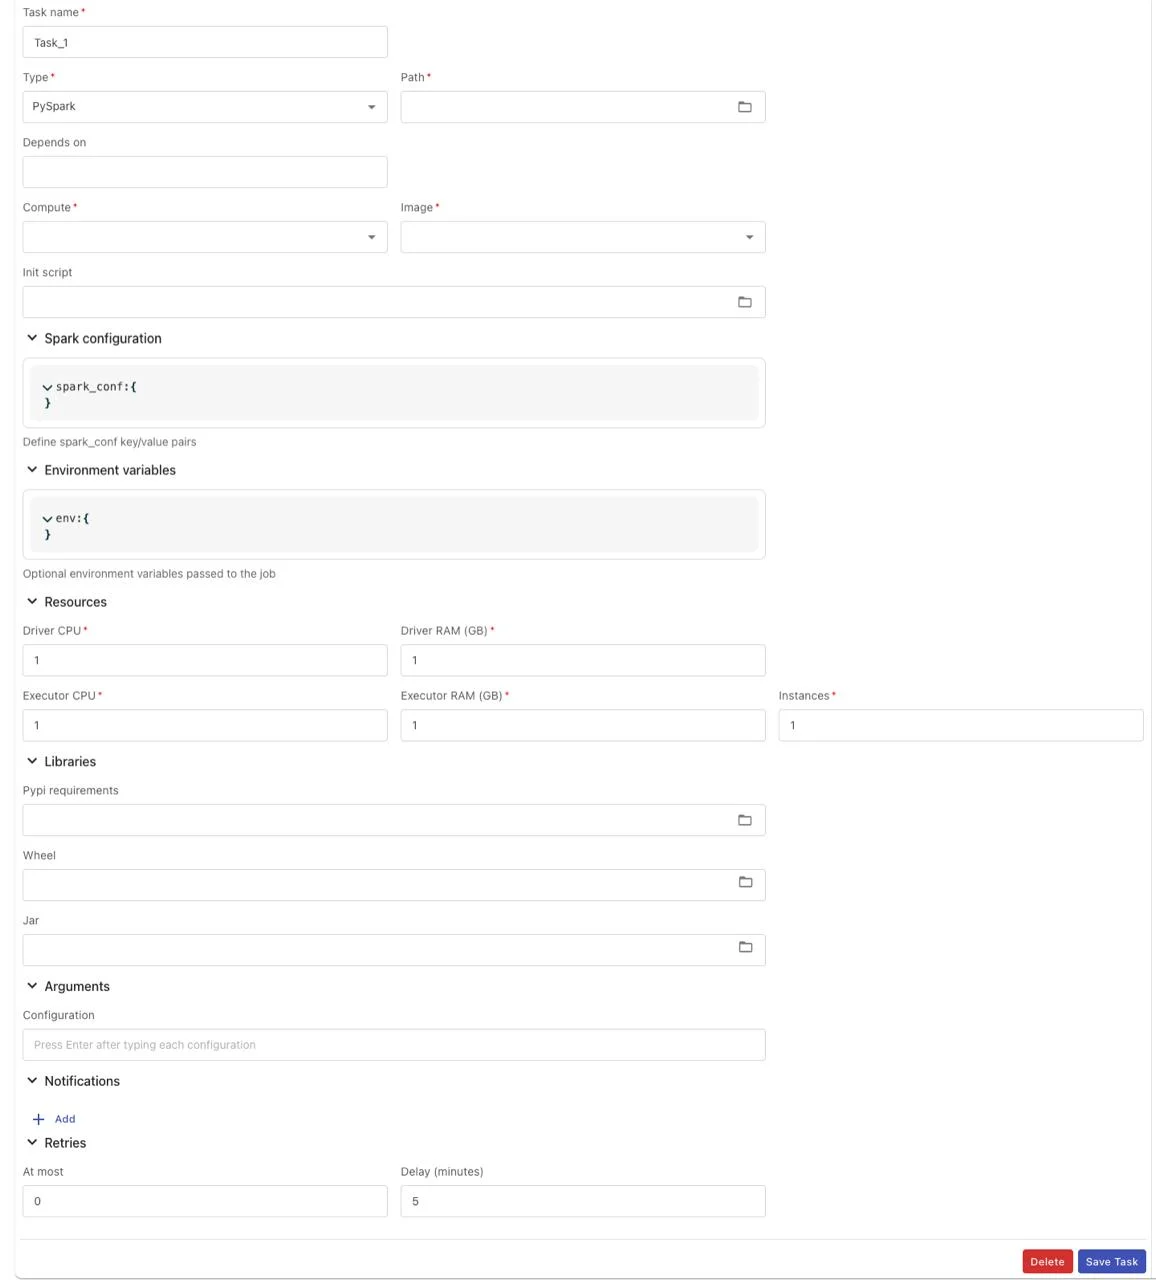
Configuration Fields
Basic Information:
-
Task name (required): Task name — letters, numbers, underscores (_), hyphens (-) only, maximum 100 characters
-
Type (required): Select "PySpark" from the dropdown list
-
Path (required): Select the Python file path (*.py) from the directory
-
Depends on: Select tasks that this task depends on (multiple selections allowed)
-
Trigger rule: Rule for triggering the task based on the status of upstream tasks
Execution Environment:
- Compute (required):
o Select the Compute to execute the script
o Select from the compute list in Processing service
o Single selection only
- Image (required): Select the appropriate runtime image:
o Python Spark 3.4.2
o Spark 3.5.0 with Python 3.10
o Spark 3.5.0 with Python3 for Openmetadata with Lakehouse
-
Init scripts: Script executed before running the PySpark script (optional)
-
Spark configuration: Configure Spark parameters in JSON Key-Value format (reference: https://spark.apache.org/docs/latest/configuration.html)
-
Environment variables: Configure environment variables in JSON Key-Value format
Resources (Spark-specific):
-
Driver CPU (required): CPU for Spark Driver (Min: 1, Max: 64)
-
Driver RAM (GB) (required): RAM for Spark Driver (Min: 1, Max: 128)
-
Executor CPU (required): CPU per Executor (Min: 1, Max: 64)
-
Executor RAM (GB) (required): RAM per Executor (Min: 1, Max: 128)
Libraries:
-
Pypi requirements: requirements.txt file
-
Wheel: .whl files (multiple selections allowed)
-
Jar: .jar files for Java runtime (multiple selections allowed)
Arguments:
- Arguments: Parameters passed when executing the script (maximum 255 characters)
Notifications:
-
Type: Select notification type (Telegram or Email)
-
Channel: Telegram channel or email address to receive notifications (5-254 characters, valid email format)
-
Event: Select the status to send notifications (running, success, failed) — multiple selections allowed
Retry Policy:
-
At most (required): Number of retries when the script fails (Min: 0, Max: 10)
-
Delay (required): Wait time between retries, in minutes (Min: 1, Max: 10)
Steps
Step 1: Click Add task on the workflow interface
Step 2: Select Type = "PySpark" from the dropdown
Step 3: Fill in all required fields including resources for both Driver and Executor
Step 4: (Optional) Configure:
-
Spark configuration
-
Environment variables
-
Jar libraries (if needed)
Step 5: Click Save Task to save the configuration
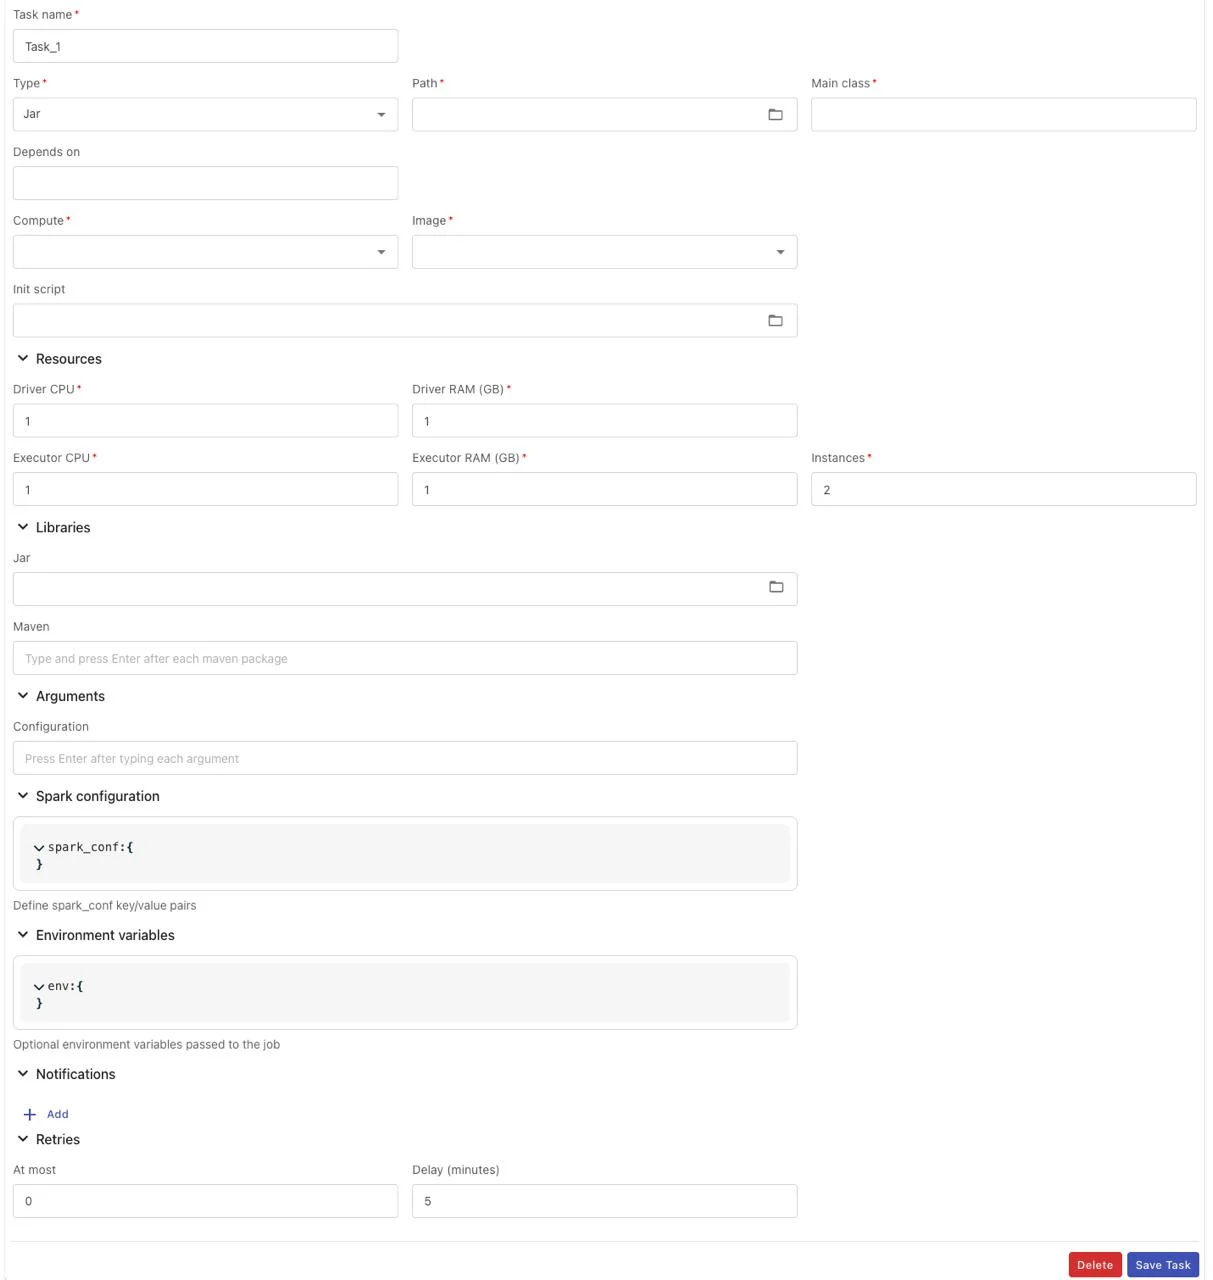
Task Type: Jar
Jar tasks allow executing Java/Scala applications packaged as JAR files, suitable for Spark jobs written in Scala or Java.
Configuration Fields
Basic Information:
-
Task name (required): Task name — letters, numbers, underscores (_), hyphens (-) only, maximum 100 characters
-
Type (required): Select "Jar" from the dropdown list
-
Path (required): Select the JAR file path (*.jar) from the directory
-
Main class (required): The Java class name containing the main() method to start execution (maximum 255 characters, letters, numbers, dots (.), underscores (_) only)
-
Depends on: Select tasks that this task depends on (multiple selections allowed)
-
Trigger rule: Rule for triggering the task based on the status of upstream tasks
Execution Environment:
- Compute (required):
o Select the Compute to execute the script
o Select from the compute list in Processing service
o Single selection only
- Image (required): Select the appropriate runtime image:
o Scala Spark 3.4.2
o Spark 3.5.0 with Scala 2.12
-
Init scripts: Script executed before running the Jar script (optional)
-
Spark configuration:
o Configure Spark parameters
o JSON Key-Value format: https://spark.apache.org/docs/latest/configuration.html
- Environment variables:
o Configure environment parameters
o JSON Key-Value format
Resources:
-
Driver CPU (required): Driver CPU resource for running the job (Min: 1, Max: 64)
-
Driver RAM (GB) (required): Driver RAM resource for running the job (Min: 1, Max: 128)
-
Executor CPU (required): Executor CPU resource for running the job (Min: 1, Max: 64)
-
Executor RAM (GB) (required): Executor RAM resource for running the job (Min: 1, Max: 128)
Libraries:
-
Pypi requirements: Select the Python library installation file requirements.txt
-
Wheel: Select the Python library installation file *.whl
-
Jar: Select the Java runtime library installation file *.jar (multiple selections allowed)
Arguments:
- Arguments: Parameters passed when executing the script (maximum 255 characters)
Notifications:
-
Type: Select notification type (Telegram or Email)
-
Channel: Telegram channel or email address to receive notifications (5-254 characters, valid email format)
-
Event: Select the status to send notifications (running, success, failed) — multiple selections allowed
Retry Policy:
-
At most (required): Number of retries when the script fails (Min: 0, Max: 10)
-
Delay (required): Wait time between retries, in minutes (Min: 1, Max: 10)
Steps
Step 1: Click Add task on the workflow interface
Step 2: Select Type = "Jar" from the dropdown
Step 3: Fill in all required fields:
-
Task name
-
Path to the JAR file
-
Main class (e.g., com.example.MainApp)
-
Compute, Image
-
Driver and Executor resources
Step 4: (Optional) Add dependent JAR files if needed
Step 5: Click Save Task
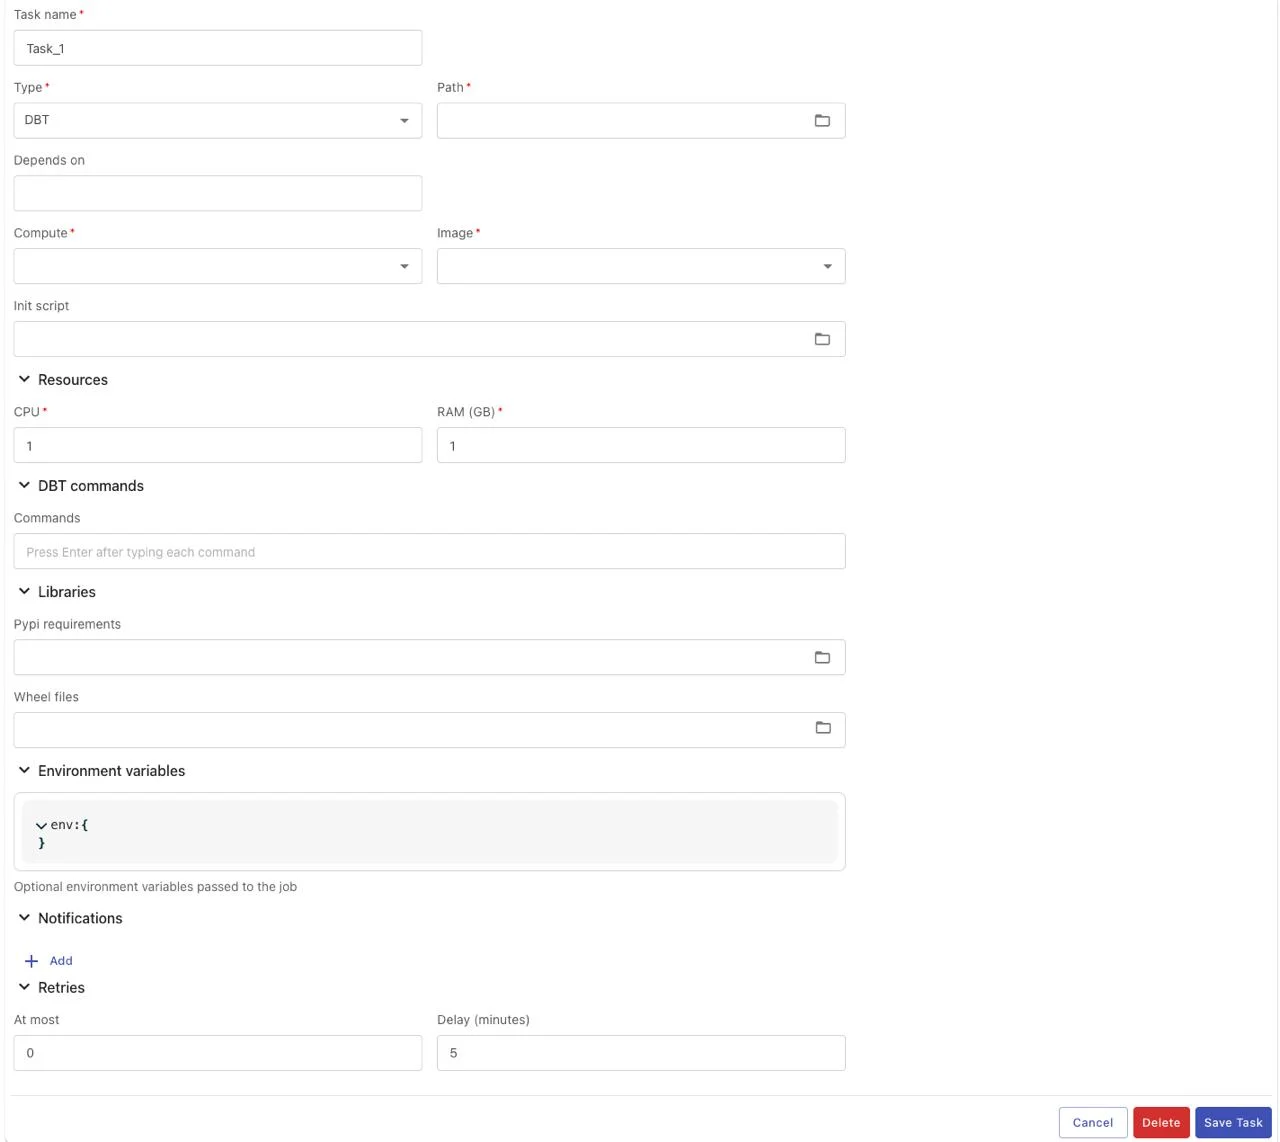
Task Type: DBT
DBT tasks allow executing DBT (Data Build Tool) projects, suitable for transforming data in a data warehouse using the ELT model.
Configuration Fields
Basic Information:
-
Task name (required): Task name — letters, numbers, underscores (_), hyphens (-) only, maximum 100 characters
-
Type (required): Select "DBT" from the dropdown list
-
Path (required): Path to the directory containing the DBT project
-
Depends on: Select tasks that this task depends on (multiple selections allowed)
-
Trigger rule: Rule for triggering the task based on the status of upstream tasks
Execution Environment:
- Compute (required):
o Select the Compute to execute the script
o Select from the compute list in Processing service
o Single selection only
- Image (required): Select the appropriate runtime image:
o DBT Core 1.9
- Init scripts: Script executed before running the DBT script (optional)
Resources:
-
CPU (required): Number of CPU cores for DBT (Min: 1, Max: 64)
-
RAM (GB) (required): RAM capacity for DBT (Min: 1, Max: 128)
DBT Commands:
- Commands (required): List of DBT commands to execute
o Each command: 7-100 characters, letters, numbers, hyphens (-), underscores (_), spaces only
o Maximum 20 commands
o Examples: dbt run, dbt test, dbt snapshot
Libraries:
-
Pypi requirements: Select the Python library installation file requirements.txt
-
Wheel: Select the Python library installation file *.whl
Environment variables:
- Configure environment variables in JSON Key-Value format
Arguments:
- Arguments: Parameters passed when executing the script (maximum 255 characters)
Notifications:
-
Type: Select notification type (Telegram or Email)
-
Channel: Telegram channel or email address to receive notifications (5-254 characters, valid email format)
-
Event: Select the status to send notifications (running, success, failed) — multiple selections allowed
Retry Policy:
-
At most (required): Number of retries when the script fails (Min: 0, Max: 10)
-
Delay (required): Wait time between retries, in minutes (Min: 1, Max: 10)
Steps
Step 1: Click Add task on the workflow interface
Step 2: Select Type = "DBT" from the dropdown
Step 3: Fill in all required information:
-
Task name
-
Path to the DBT project directory
-
Compute, Image
-
CPU and RAM
Step 4: Enter the DBT commands to execute (e.g., dbt run, dbt test)
Step 5: (Optional) Configure environment variables if needed
Step 6: Click Save Task
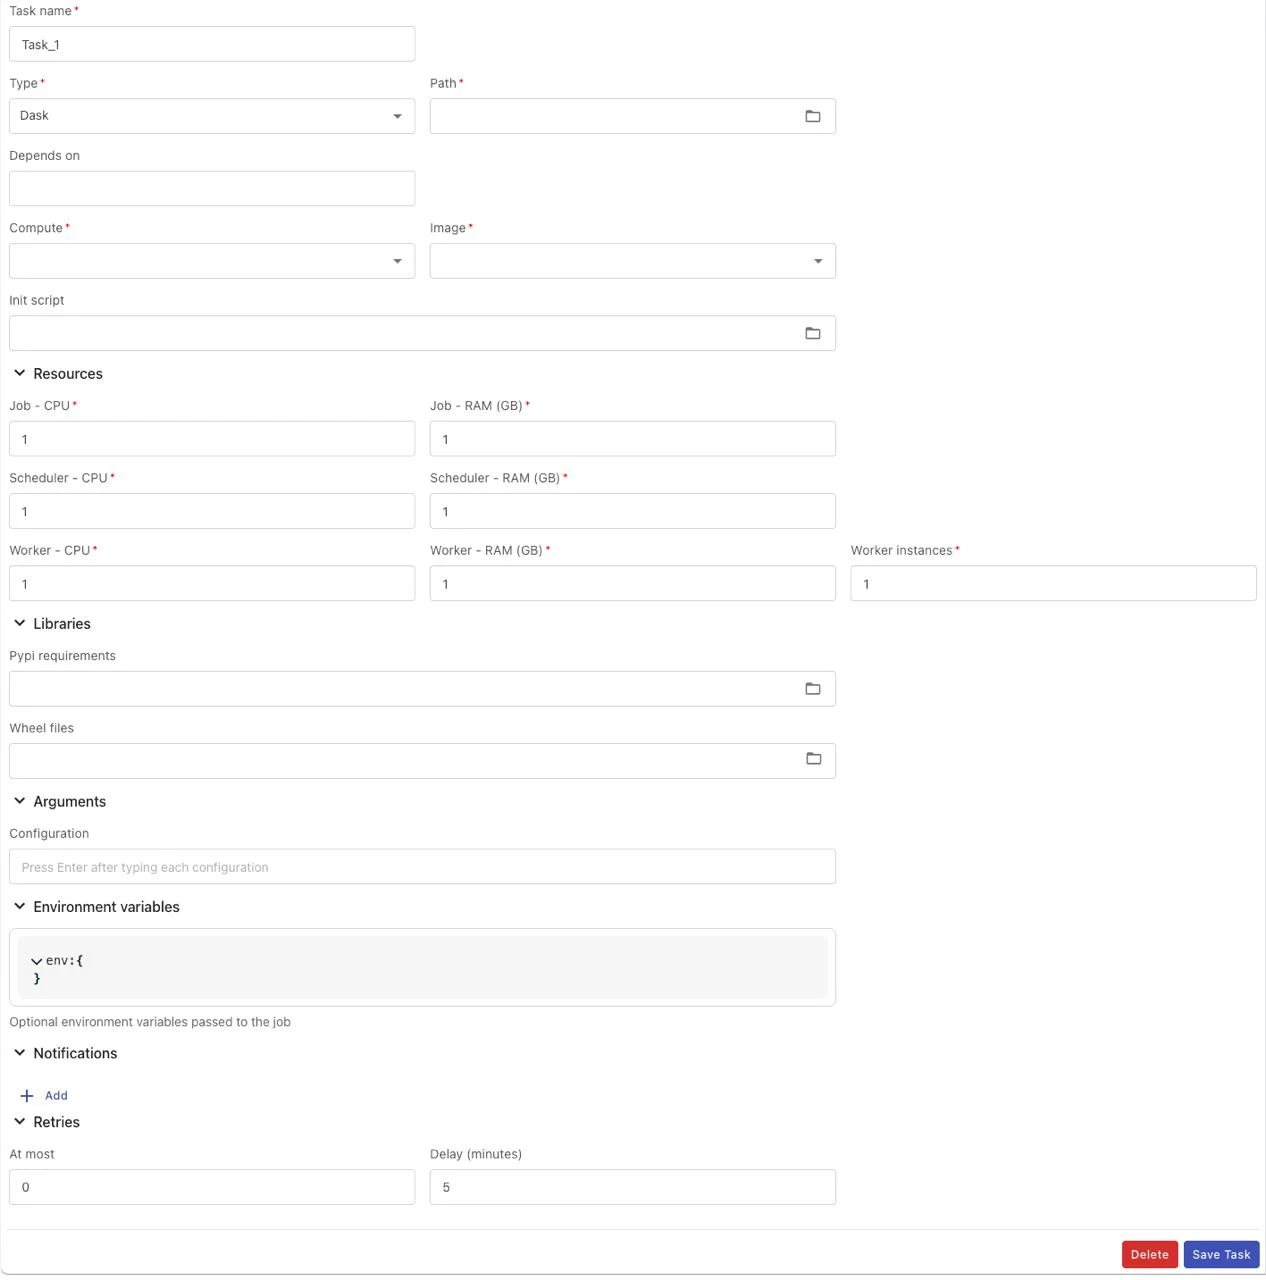
Task Type: Dask
Dask tasks allow executing parallel data processing jobs with the Dask framework, suitable for large-scale data processing with Python in a distributed environment.
Configuration Fields
Basic Information:
-
Task name (required): Task name — letters, numbers, underscores (_), hyphens (-) only, maximum 100 characters
-
Type (required): Select "Dask" from the dropdown list
-
Path (required): Select the Python file path (*.py) from the directory
-
Depends on: Select tasks that this task depends on (multiple selections allowed)
-
Trigger rule: Rule for triggering the task based on the status of upstream tasks
Execution Environment:
- Compute (required):
oSelect the Compute to execute the scriptoSelect from the compute list in Processing serviceoSingle selection only - Image (required): Select the appropriate runtime image:
oPython Dask 2025.4.1 (Beta) - Init scripts: Script executed before running the Python script (optional)
Resources (Dask-specific):
- Job - CPU (required): CPU for the Job (Min: 1, Max: 64)
- Job - RAM (GB) (required): RAM for the Job (Min: 1, Max: 128)
- Scheduler - CPU (required): CPU for the Dask Scheduler (Min: 1, Max: 64)
- Scheduler - RAM (GB) (required): RAM for the Dask Scheduler (Min: 1, Max: 128)
- Worker - CPU (required): CPU per Dask Worker (Min: 1, Max: 64)
- Worker - RAM (GB) (required): RAM per Dask Worker (Min: 1, Max: 128)
- Worker instances (required): Number of Workers (Min: 1, Max: 100)
Libraries:
- Pypi: requirements.txt file containing the list of Python libraries to install
- Wheel: .whl files (multiple files can be selected)
Arguments:
- Arguments: Parameters passed when executing the script (maximum 255 characters)
Notifications:
- Type: Select notification type (Telegram or Email)
- Channel: Telegram channel or email address to receive notifications (5-254 characters, valid email format)
- Event: Select the status to send notifications (running, success, failed) — multiple selections allowed
Retry Policy:
- At most (required): Number of retries when the script fails (Min: 0, Max: 10)
- Delay (required): Wait time between retries, in minutes (Min: 1, Max: 10)
Steps
Step 1: Click Add task on the workflow interface
Step 2: Select Type = "Dask" from the dropdown
Step 3: Fill in all resource information for:
- Job
- Scheduler
- Worker (including number of instances)
Step 4: Configure other information as in Python Task
Step 5: Click Save Task
Delete Task
Deleting a task removes it from the workflow along with all associated dependencies.
Steps
Step 1: On the workflow detail interface, click the task you want to delete on the Graph View
Step 2: The task configuration form will appear below
Step 3: Click the Delete button (red) in the lower-left corner of the form

Step 4: A confirmation popup appears with:
- Title: Delete task
- Message: Are you sure you want to delete task "{{task_name}}"? This action cannot be undone.
Step 5: Click Delete to confirm deletion or Cancel to abort

Step 6: After confirmation, the system:
-
Removes the task from the workflow
-
Removes all dependencies associated with this task
-
Displays a notification:
o Subject: Success
o Message: Task deleted successfully!
Step 7: The task disappears from the Graph View
Note:
-
The deletion action cannot be undone
-
If other tasks depend on the deleted task (downstream tasks), update their dependencies accordingly
-
Deleting a task affects the workflow execution flow; review carefully before deleting
-
Consider backing up the task configuration before deleting (take a screenshot or note down the parameters)
5. Update Workflow Information
After creating a workflow, you can update basic information, the schedule, and notification configuration.
Update Basic Information

Step 1: On the workflow detail interface, find the Basic Information section on the right
Step 2: Click the Edit icon (pencil icon) at the top right of the Basic Information section
Step 3: The "Workflow Basic Information" popup appears with the following fields:
| Field | Description | Requirements |
|---|---|---|
| Name | Workflow name | Required. 3-100 characters, letters, numbers, _, - only. Must be unique among workflows in the system |
| Description | Workflow description | Optional. Maximum 255 characters |
| Tags | Tags for the workflow | Optional. Each tag 1-30 characters, letters, numbers, -, _ only. No duplicate tags within the same workflow. Maximum 10 tags |
Step 4: Edit the required information
Step 5: Click Save to save changes or Cancel to abort
Step 6: The system displays a notification:
-
Subject: Success
-
Message: Workflow updated successfully!
Note: If the workflow name already exists, the system will show an error:
-
Subject: Error
-
Message: Workflow with name '{{workflow_name}}' already exists
Update Schedule
Schedule allows setting up automatic run schedules for the workflow.
Step 1: On the workflow detail interface, find the Schedule section on the right
Step 2: Click the Edit icon at the top right of the Schedule section
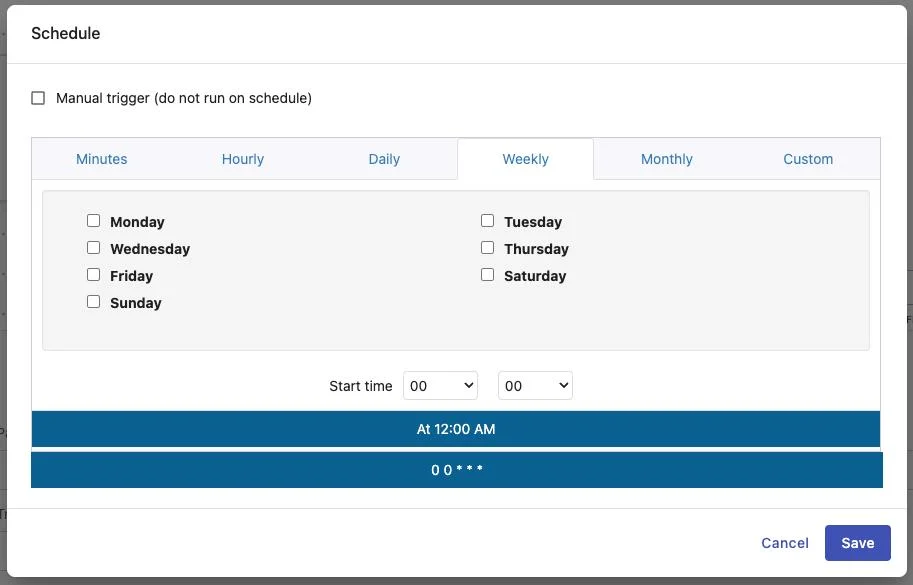
Step 3: The "Schedule" popup appears with the following options:
Manual trigger:
- Checkbox "Manual trigger (do not run on schedule)" — Workflow runs only when manually triggered
Schedule interval (if Manual trigger is not selected):
-
Minutes: Run by minute interval
-
Hourly: Run hourly
-
Daily: Run daily
-
Weekly: Select days of the week (Monday, Tuesday, Wednesday, Thursday, Friday, Saturday, Sunday)
-
Monthly: Run monthly
-
Custom: Enter a custom cron expression
Start time:
- Select the hour and minute when the workflow starts running
Cron expression preview:
-
The system displays the cron expression corresponding to the selected options
-
Example: 0 0 * * * (runs at 12:00 AM every day)
Step 4: Configure the schedule as needed
Step 5: Click Save to save changes or Cancel to abort
Step 6: The system displays a notification:
-
Subject: Success
-
Message: Schedule updated successfully!
Note:
-
The cron expression must follow the correct 5-field syntax (minute, hour, day-of-month, month, day-of-week)
-
Valid characters: * , - /
-
No newlines allowed
-
Maximum 100 characters
Update Notifications (Workflow level)
Configure notifications for the entire workflow when events occur.
Step 1: On the workflow detail interface, find the Notifications section on the right
Step 2: Click the Edit icon at the top right of the Notifications section
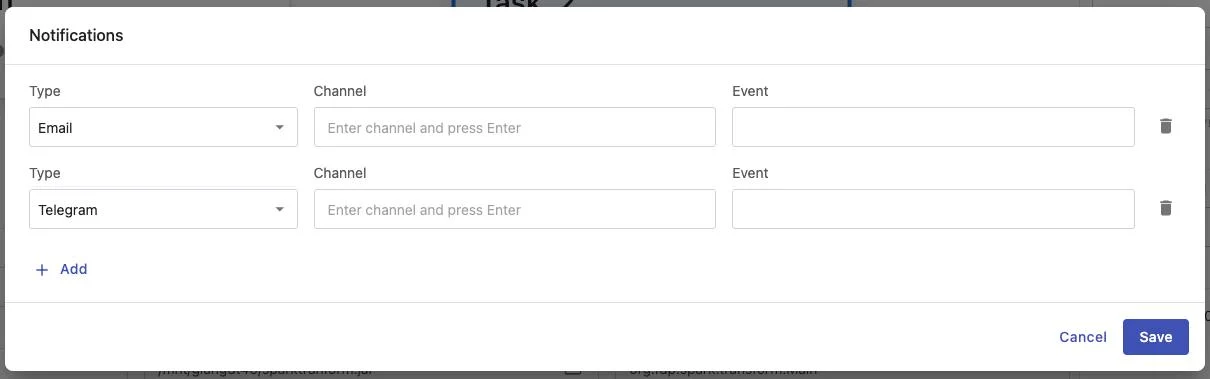
Step 3: The "Notifications" popup appears with the following fields:
| Field | Description |
|---|---|
| Type | Select notification type: Telegram or Email |
| Channel | Telegram channel or Email address to receive notifications (5-254 characters, valid email format) |
| Event | Select the status to send notifications: running, success, failed (multiple selections allowed) |
Step 4: Click the Add button (+) to add a new notification configuration
Step 5: Fill in the information for each notification:
-
Select Type (Telegram/Email)
-
Enter Channel (Telegram channel name or email)
-
Select Event (running, success, failed)
Step 6: Add multiple notifications by clicking Add multiple times
Step 7: To delete a notification, click the Delete icon (trash) next to it
Step 8: Click Save to save the configuration or Cancel to abort
Step 9: The system displays a notification:
-
Subject: Success
-
Message: Notifications updated successfully!
Update Notifications (Task level)

In addition to workflow-level notifications, each task can also configure its own notifications.
Step 1: Click on a task in the Graph View to open the task configuration form
Step 2: Scroll down to the Notifications section in the task form
Step 3: Click the expand icon (dropdown) for the Notifications section
Step 4: Click the Add button to add a new notification
Step 5: Fill in the notification information (same as workflow level):
-
Type (Telegram/Email)
-
Channel
-
Event (running, success, failed)
Step 6: Multiple notifications can be added for the task
Step 7: Click Save Task to save the task configuration
Note:
-
Task notifications are independent from workflow notifications
-
If both the workflow and task have notifications configured, both will be sent when the corresponding event occurs
6. Configure Notification Channels
Before using notifications in workflows/tasks, notification channels must be configured first.
Access Notification Management
Step 1: In the main menu bar, select Workflow Engine
Step 2: In the dropdown menu, select Notifications
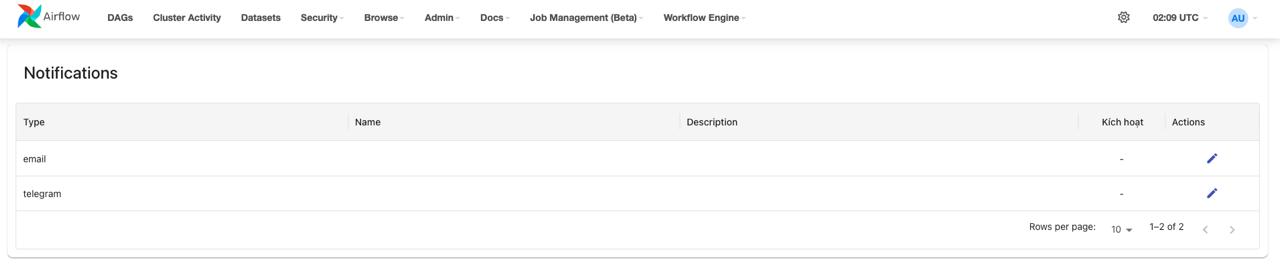
Step 3: The notification channels list interface displays the following information:
-
Type: Notification type (email/telegram)
-
Name: Configuration name
-
Description: Description
-
Active: Active/inactive status
-
Actions: Operations (Edit)
Configure Email Notification
Step 1: In the Notifications list, find the row with Type = "email"
Step 2: Click the Edit icon (pencil) in the Actions column
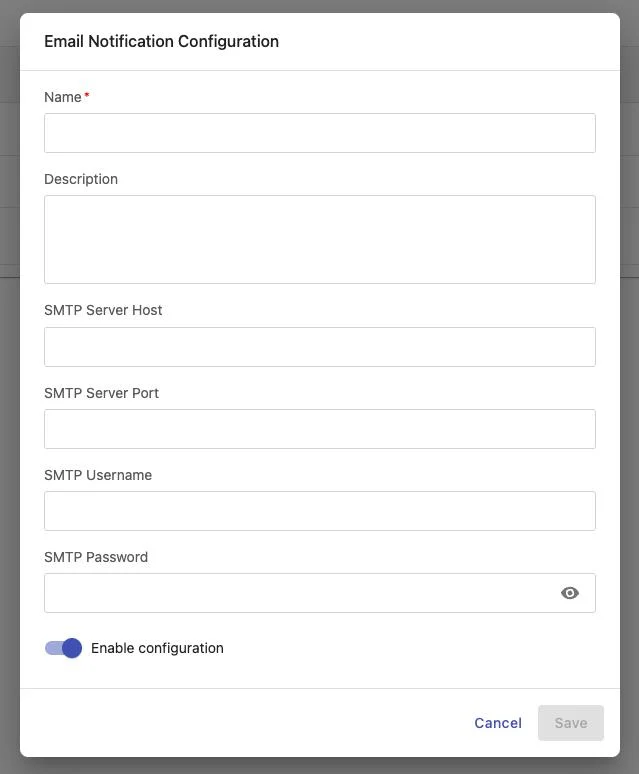
Step 3: The "Email Notification Configuration" popup appears with the following fields:
| Field | Description | Requirements |
|---|---|---|
| Name | Email configuration name | Required |
| Description | Configuration description | Optional |
| SMTP Server Host | SMTP server address (e.g., smtp.gmail.com) | Required |
| SMTP Server Port | SMTP server port (e.g., 587, 465) | Required |
| SMTP Username | SMTP login username | Required |
| SMTP Password | SMTP password (show/hide button) | Required |
| Enable configuration | Toggle to enable/disable configuration | — |
Step 4: Fill in all SMTP server information:
-
Host: SMTP server address of your email provider
-
Port: Typically 587 (TLS) or 465 (SSL)
-
Username: Email or login username
-
Password: App password or email password
Step 5: Enable the Enable configuration toggle to activate
Step 6: Click Save to save the configuration or Cancel to abort
Note:
-
For Gmail, create an "App Password" instead of using your regular password
-
For Office 365, configure SMTP authentication
-
Test the SMTP connection before using in production
Configure Telegram Notification

Step 1: In the Notifications list, find the row with Type = "telegram"
Step 2: Click the Edit icon in the Actions column
Step 3: The "Telegram Notification Configuration" popup appears with the following fields:
| Field | Description | Requirements |
|---|---|---|
| Name | Telegram configuration name | Required |
| Description | Configuration description | Optional |
| Telegram Bot Token | Telegram Bot token (show/hide button) | Required |
| Enable configuration | Toggle to enable/disable configuration | — |
Step 4: Obtain the Telegram Bot Token:
-
Open Telegram and find @BotFather
-
Send the command /newbot to create a new bot
-
Set the name and username for the bot
-
BotFather will return the Bot Token (format: 123456789:ABCdefGHIjklMNOpqrsTUVwxyz)
Step 5: Copy the Bot Token and paste it into the Telegram Bot Token field
Step 6: Enable the Enable configuration toggle to activate
Step 7: Click Save to save the configuration or Cancel to abort
Step 8: Get the Chat ID/Channel:
-
Add the bot to the group/channel where you want to receive notifications
-
Send any message in the group/channel
-
Access the URL: https://api.telegram.org/bot{YOUR_BOT_TOKEN}/getUpdates
-
Find chat.id in the JSON response
-
Use this Chat ID when configuring notifications in workflows/tasks
Note:
-
The bot must be added to the group/channel before it can send notifications
-
For channels, the bot needs "Post Messages" permission
-
Negative Chat IDs are groups/channels; positive Chat IDs are personal chats
7. Run Workflow
There are 2 ways to run a workflow: manually and automatically on a schedule.
Manual Trigger
Method 1: From the workflow list
Step 1: On the workflow list interface, find the workflow to run
Step 2: Click the Trigger workflow icon (play button) in the Actions column
Step 3: The workflow will be triggered to run immediately
Method 2: From the workflow detail
Step 1: Click on the workflow name to enter the detail interface
Step 2: Click the Run button in the upper right corner
Step 3: The workflow will be triggered to run immediately
Automatic Scheduled Run
The workflow will run automatically according to the schedule configured in the Schedule section (see section 5.5.2).
View Run History
Method 1: From the workflow list
Click the View graph icon (graph icon) in the Actions column
Method 2: From the workflow detail
Click the History button in the upper right corner
Displayed information:
-
List of workflow runs
-
Start and end times
-
Status (success, failed, running)
-
Detailed log of each task
8. Delete Workflow
Deleting a workflow removes the entire workflow, all tasks within it, and all associated data (run history, logs).
Steps
Method 1: From the workflow list

Step 1: On the workflow list interface, find the workflow to delete
Step 2: Click the Delete icon (trash) in the Actions column
Step 3: A confirmation popup appears:
-
Title: Delete workflow
-
Message: Are you sure you want to delete workflow "{{workflow_name}}"? This action cannot be undone.
Step 4: Click Delete to confirm deletion or Cancel to abort
Step 5: The system deletes the workflow and displays a notification:
-
Subject: Success
-
Message: Workflow deleted successfully!
Step 6: Returns to the workflow list screen
Method 2: From the workflow detail

Step 1: Click on the workflow name to enter the detail interface
Step 2: Click the Delete button in the upper right corner
Step 3: A confirmation popup appears:
-
Title: Delete workflow
-
Message: Are you sure you want to delete workflow "{{workflow_name}}"? This action cannot be undone.
Step 4: Click Delete to confirm deletion or Cancel to abort
Step 5: The system deletes the workflow and displays a notification:
-
Subject: Success
-
Message: Workflow deleted successfully!
Step 6: Returns to the workflow list screen
Note:
-
The deletion action cannot be undone
-
All run history and logs will be deleted along with the workflow
-
If the workflow is currently running, stop it before deleting