Create a target
A target is a scan object that FPT VA scans for security vulnerabilities. Targets are created on FPT Portal and can be a website, a public IP address, or an IP range you manage.
-
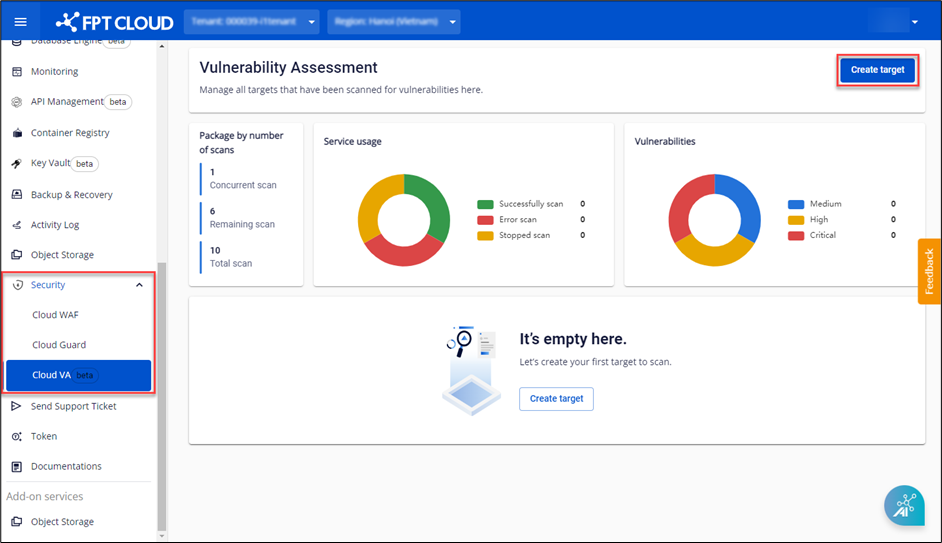
From the menu, select Security > Cloud VA, then click Create target.
 note
noteIf your Tenant has not been granted access to the service, you will see the message You do not have sufficient permissions to view this page!. Select the correct Tenant that has been allocated quota.
-
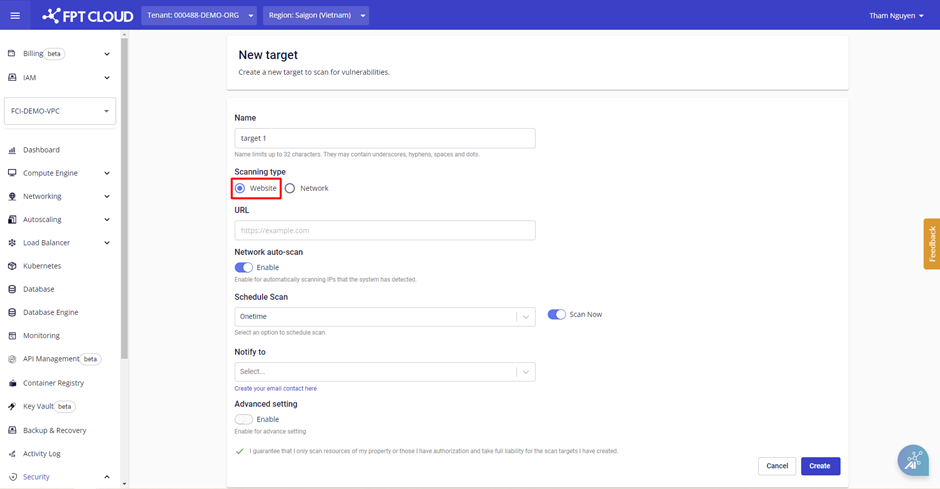
Configure the scan by filling in the required fields:
Field Description Name Name of the scan target. Scanning type Select the target type: Website (web application) or Network (IP or IP range). URL* URL of the web application to scan. Required when Scanning type is Website. Network auto-scan Enable to also scan the IP address of the web application. IP address IP address or IP range to scan. Required when Scanning type is Network. Scan mode Scan mode for Network targets: Host Discovery, Standard Scan, Deep Scan, Brute Force Scan, or Log4Shell Scan. Schedule Scan Scan schedule: Onetime, Daily, Weekly, or Monthly. Start on Date and time the system starts scanning. Repeat on Days the system repeats the scan within a week or month. Scan Now Scan immediately at creation time; subsequent scans follow the schedule. Notify to Select email recipients to be notified after a successful scan. 
You can also enable Advanced settings for deeper scan configuration.
For Website targets, the following additional fields are available:
Field Description Exclude URLs List of paths to skip during scanning. Custom Header Configure custom headers to maintain an authenticated session during scanning. See Get website headers. Custom Cookies Configure custom cookies to maintain an authenticated session during scanning. See Get website cookies. Login using your account Configure login credentials: None, Basic authentication, or Login form. For Network targets, the following additional fields are available:
Field Description Port list Set of service ports to check. Excluded IP List of IP addresses to skip during scanning. Alive test Method for determining whether a device exists on the network: Default, Custom, or Consider Alive. Authenticate scan Login configuration for authenticated scanning: None, SSH, or SMB. See Enable Remote Registry on Windows for SMB. Monitor Monitor device status and service port status to detect anomalies. warningYou are fully responsible for the URLs you declare. Only scan URLs that you own. For deeper scanning of targets that require login, configure an appropriate authentication method.
-
Click Create to initialize the target. The system will validate resources and process the scan based on the configuration provided.
After successful creation, the new target appears in the management dashboard with the following information:
- Name: Target name.
- Scanning type: Scan type.
- Scanning status: Status of the most recent scan.
- Detected risk: Number of risks detected in the most recent scan.
- Last scanned: Time of the most recent scan.