SLURM on FPT Cloud
FPT Managed GPU Cluster is built on the open-source K8s platform, automating the deployment, scaling, and management of containerized applications. FPT Managed GPU Cluster integrates Container Orchestration, Storage, Networking, Security, and PaaS components to provide customers with the best environment for developing and deploying applications on the cloud.
FPT Managed GPU Cluster is a managed GPU cluster service model from FKE. With Managed GPU Cluster, FPT Cloud manages all control-plane components while users deploy and manage the Worker Nodes. Managed GPU Cluster lets users focus on application deployment without spending resources on managing the K8s cluster.
FPT Managed GPU Cluster is a service model based on the open-source Kubernetes platform that automates the deployment, scaling, and management of containerized applications. In addition to integrating Container Orchestration, Storage, Networking, Security, and PaaS components, FPT Managed GPU Cluster also provides GPU resources to support complex compute operations.
Things to be aware of before using Managed GPU Cluster:
· Managed GPU Cluster location: The geographic region can affect server access speed during use. Choose the region closest to your traffic sources to optimize speed.
· Number of nodes and their configurations: All FPT Cloud accounts are allocated a certain quota for RAM, CPU, Storage, and IP resources. Customers should determine the required resource quantities and maximum limits so that FPT Cloud can best support them.
1. Introduction to SLURM and SLURM on Kubernetes
1.1 Introduction to SLURM
SLURM is a powerful open-source platform for cluster resource management and job scheduling. It is designed to optimize performance and efficiency for supercomputers and large compute clusters. Its main components work together to ensure high system performance and flexibility. The following diagram illustrates how SLURM works.
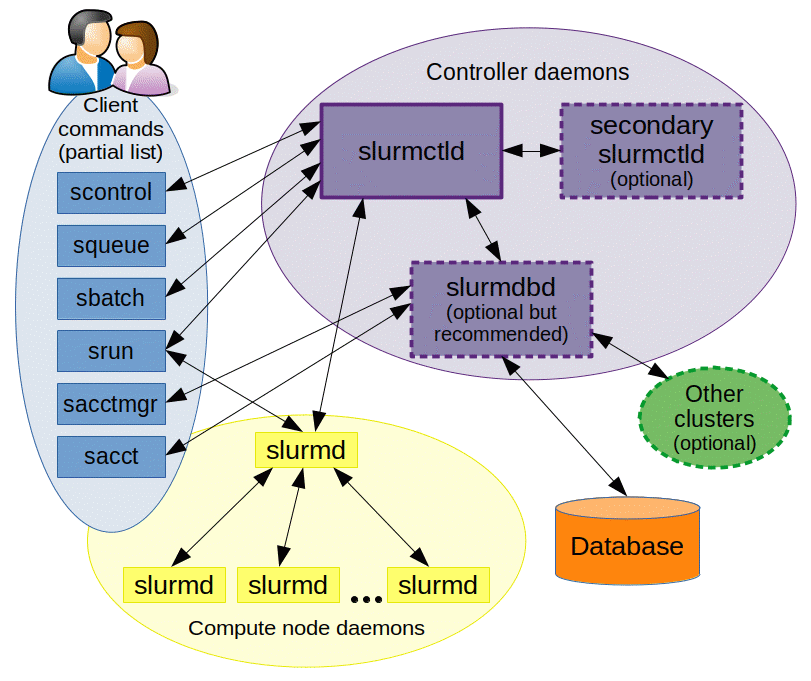
slurmctld: The SLURM control daemon. Considered the "brain" of SLURM, slurmctld monitors system resources, schedules jobs, and manages cluster state. For high availability, you can configure a secondary slurmctld to avoid service interruptions if the primary slurmctld fails.
slurmd: The SLURM node daemon. slurmd is deployed on each compute node. It receives commands from slurmctld and manages jobs, including launching and executing jobs, reporting job status, and preparing for new job commands. slurmd serves as the interface for direct communication with compute resources.
slurmdbd: The SLURM database daemon. slurmdbd is an optional but important component for long-term management and auditing in large clusters. It maintains a centralized database for job history and accounting information, and can aggregate data from multiple SLURM-managed clusters.
SlurmCLI: Provides the following commands for job management and system monitoring:
scontrol: Manage the cluster and control cluster configuration.squeue: Query job status in the queue.srun: Submit and manage jobs.sbatch: Submit batch jobs for scheduled resource management.sinfo: Query overall cluster status, including node availability.
1.2 Why SLURM on K8s?
Both SLURM and Kubernetes can serve as workload management systems for distributed model training and high-performance computing (HPC) in general.
Each system has its own strengths and weaknesses. SLURM provides advanced scheduling, efficiency, fine-grained hardware control, and accounting capabilities, but lacks versatility. Kubernetes, on the other hand, can be used for many purposes beyond training (e.g. inferencing) and provides good auto-scaling and self-healing capabilities.
Unfortunately, there is currently no way to combine the benefits of both solutions. And because many major technology companies use Kubernetes as a default infrastructure layer without supporting specialized model training systems, some ML engineers don't even have a choice.
Running SLURM on K8s allows us to reuse Kubernetes' auto-scaling and self-healing capabilities within SLURM, while deploying unique features and maintaining the familiar interaction model with the system.
1.3 Introduction to SLURM on FPT Cloud Managed GPU/K8s cluster
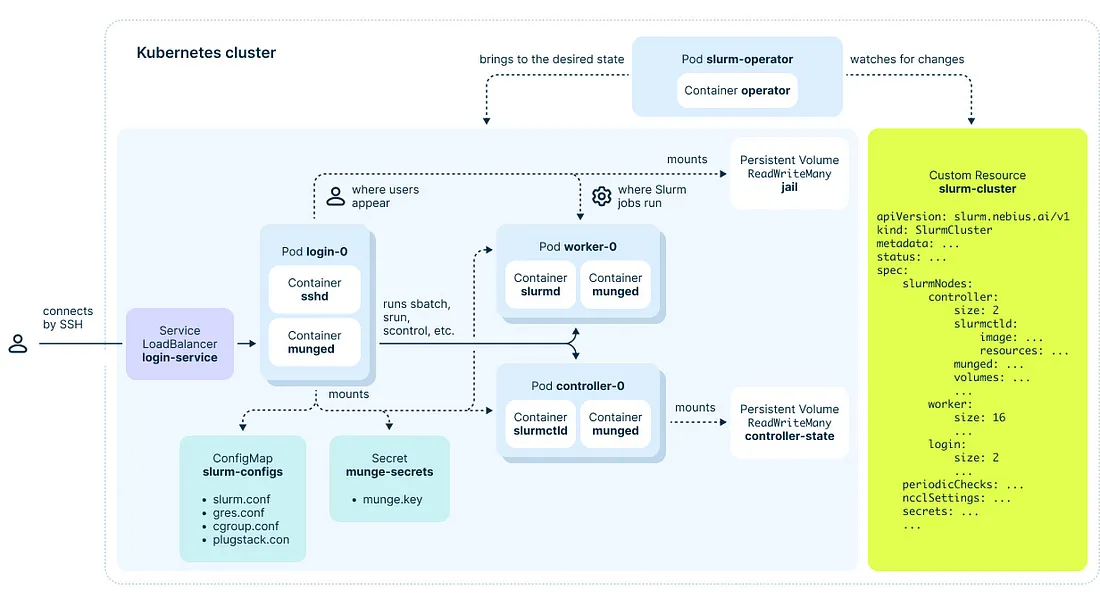
The SLURM Operator uses the SlurmCluster custom resource (CR) to define the configuration files needed to manage SLURM clusters and address control plane management issues. This simplifies the deployment and maintenance of SLURM-managed clusters. The diagram below shows the architecture of SLURM on FPTCloud Managed GPU/K8s cluster. Cluster administrators can deploy and manage a SLURM cluster through SlurmCluster. The SLURM Operator creates the SLURM control components in the cluster based on the SlurmCluster definition. A SLURM configuration file can be mounted into a control component via a shared volume or a ConfigMap.
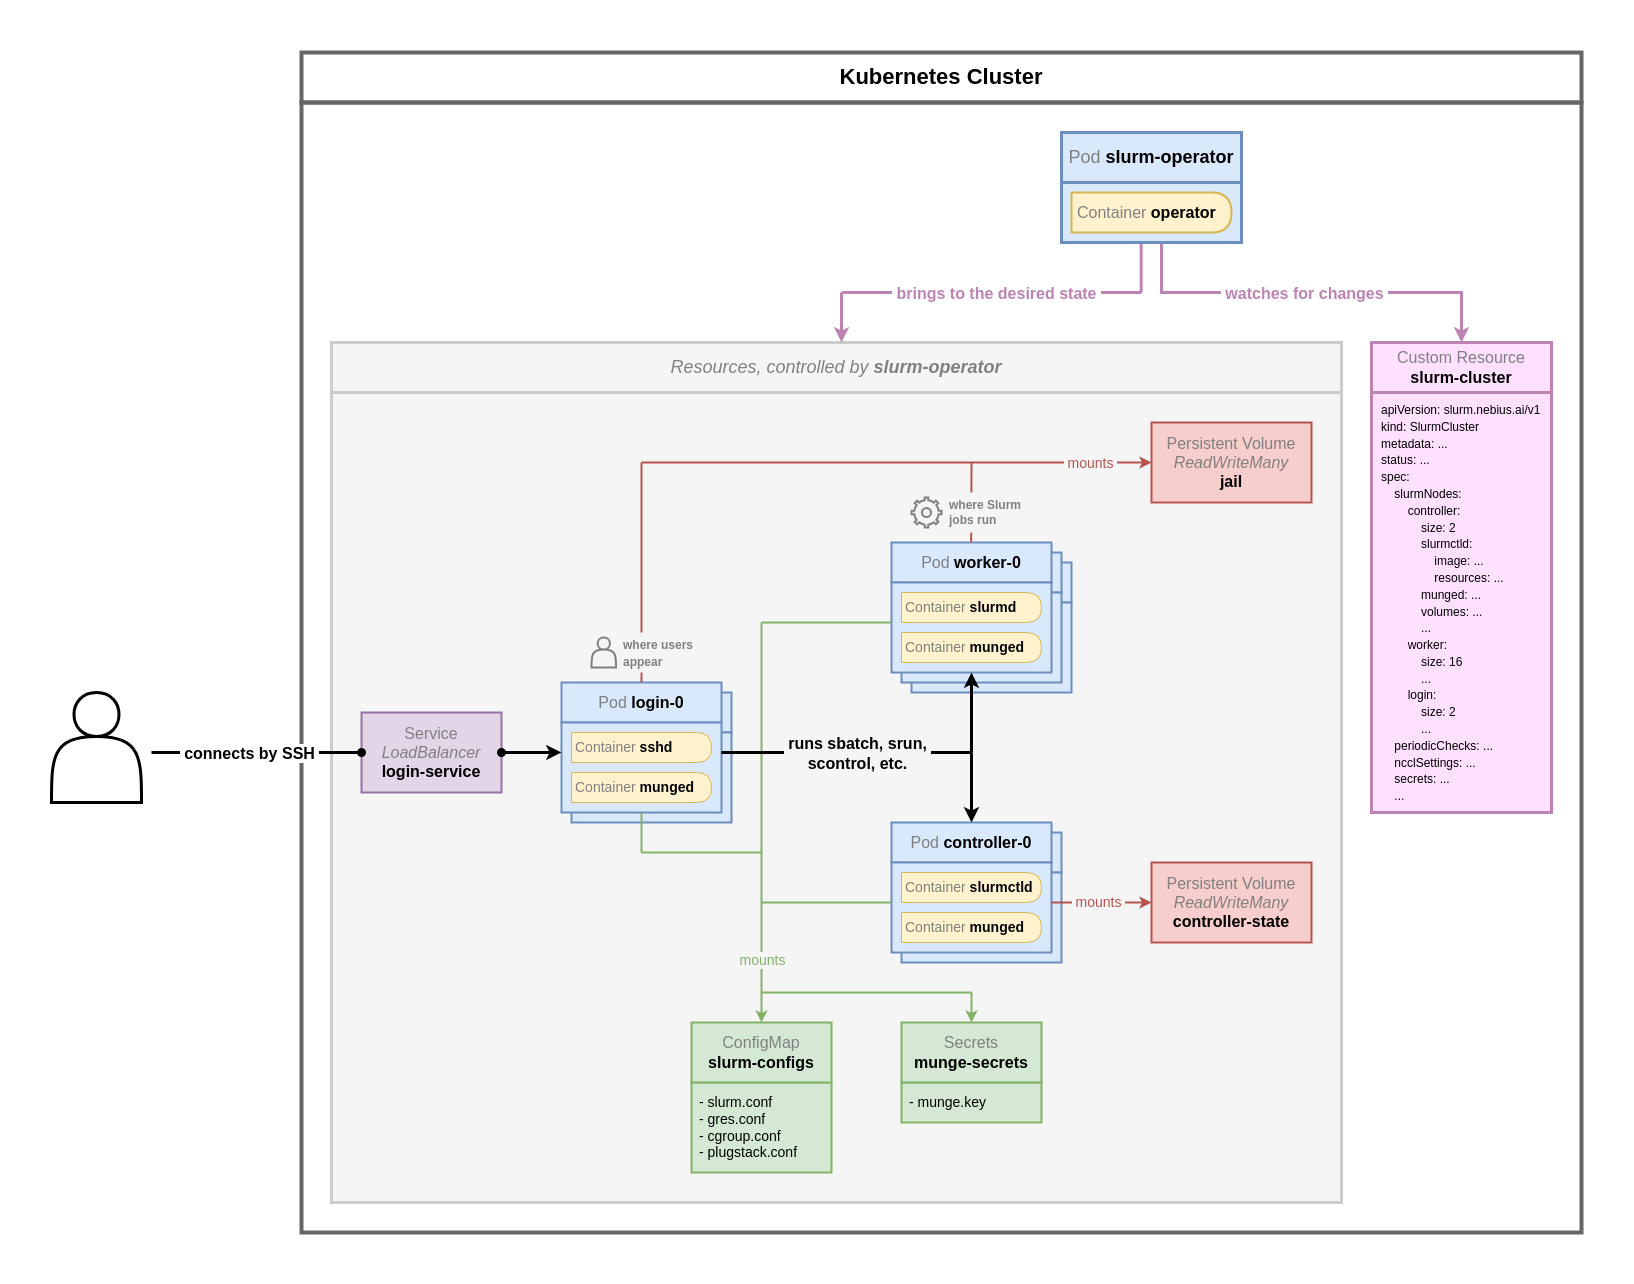
In the SLURM on K8s deployment model, components of a SLURM cluster such as login node, worker node, etc. are represented as Pods on K8s. In this model, the concept of a shared-root volume is implemented: a shared filesystem equivalent to the file system of an OS is deployed. Every job dispatched to a worker node is executed in this shared root volume environment. This ensures all worker nodes always have the same configuration, packages, and state without manual management. In other words, when you install packages on one node, those packages automatically appear on all other nodes.
All you need to do is define your desired SLURM cluster in the SlurmCluster custom resource, and the SLURM Operator will deploy and manage the SLURM cluster for you according to the state you defined in the SlurmCluster CR.
2. Installation guide
2.1 Deploy a SLURM cluster on K8s
Prerequisites:
- A K8s cluster with dynamic volume provisioning enabled and sufficient remaining storage quota.
- At least one StorageClass that can provision ReadWriteMany volumes.
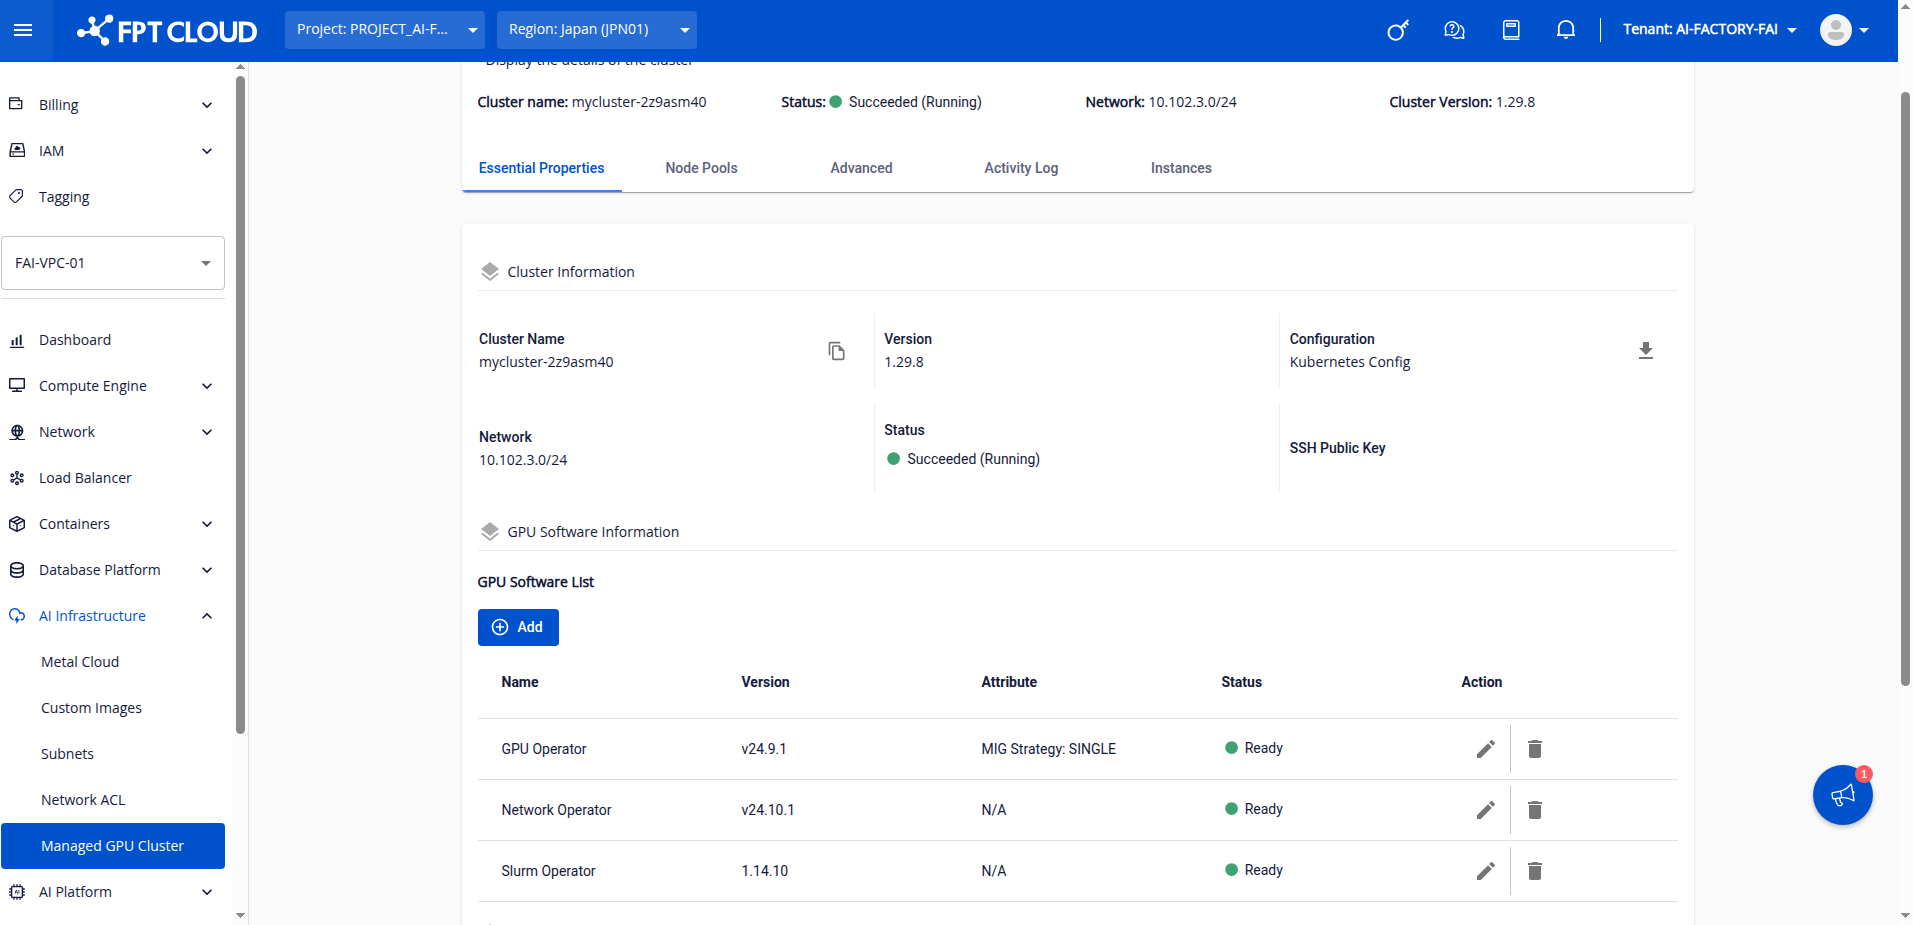
Step 1: Install SLURM Operator, GPU Operator, and Network Operator in the GPU software installation section and wait until all are in ready state.
Step 2: In the K8s cluster, create Persistent Volumes to hold the shared root space and controller node data.
Note the volumes in the SLURM on K8s deployment model:
Where:
· jail-pvc: Mounted on worker nodes and login nodes, acting as a shared sandbox — the environment where jobs are executed and users operate. This volume must be at least 40Gi to hold an OS file system.
· controller-spool-pvc: Stores cluster configuration information, located on the controller node.
jail-pvc.yaml:
apiVersion: v1
kind: PersistentVolumeClaim
metadata:
  name: jail-pvc
  namespace: fpt-hpc
spec:
  storageClassName: default
  accessModes:
    - ReadWriteMany
  resources:
    requests:
      storage: 100Gi
controller-spool-pvc.yaml (not needed for slurm operator version >= 2.0.0):
apiVersion: v1
kind: PersistentVolumeClaim
metadata:
  name: controller-spool-pvc
  namespace: fpt-hpc
spec:
  storageClassName: default
  accessModes:
    - ReadWriteMany
  resources:
    requests:
      storage: 10Gi
Notes:
- Both volumes are mandatory and must support ReadWriteMany. The PVC names must remain exactly as shown above.
- For convenience, we use dynamic volume provisioning on FPTcloud managed K8s.
- For production environments, we recommend mounting the root volume from a static partition on a file server to facilitate SLURM cluster migration and maintenance.
Step 3: Download the SLURM cluster CR Helm chart and define the desired configuration.
helm repo add xplat-fke https://registry.fke.fptcloud.com/chartrepo/xplat-fke
helm repo update
helm repo list
helm search repo slurm
helm pull xplat-fke/helm-slurm-cluster --version 1.14.10 --untar=true
Note: Match the slurm-cluster version to the version of the SLURM Operator.
To learn more about SLURM cluster parameters, read section 3: SLURM cluster parameter descriptions.
cd helm-slurm-cluster/
vi values.yaml
In the values.yaml file, update the following important fields:
| Field | Description |
|---|---|
| slurmNodes.worker.size | Number of worker nodes |
| slurmNodes.worker.size.spool.volumeClaimTemplateSpec.storageClassName | StorageClass for the PV storing worker node state |
| slurmNode.login.sshRootPublicKeys | List of root user public keys in the SLURM cluster |
| SlurmNode.accounting.mariadbOperator.storage.volumeClaimTemplate.storageClassName | StorageClass for the PV storing data at the slurmdbd node |
After configuring the cluster as desired, run:
helm install fpt-hpc ./ -n fpt-hpc
Step 4: Wait until all SLURM pods are in Running state. The first-time install of a SLURM cluster on K8s takes approximately 20 minutes and includes two phases: phase 1 runs a setup job, and phase 2 installs the SLURM component pods.
Once all components are ready, find the public IP of the login node:
kubectl get svc -n fpt-hpc | grep login
SSH into the SLURM cluster head node:
ssh root@IP_login_svc
If using nodeshell:
chroot /mnt/jail
sudo -i
Run checks:
srun --nodes=2 --gres=gpu:1 nvidia-smi -L
salloc --nodes=1 --ntasks=1 --mem=4G --time=00:20:00 --gres=gpu:1
2.2 Run a sample job on the SLURM cluster
After successfully logging into the SLURM cluster, test the cluster by training a minGPT model:
Step 1: Clone the pytorch/examples repository.
mkdir /shared
cd /shared
git clone https://github.com/pytorch/examples
Step 2: Navigate to the minGPT-ddp folder and install required packages.
cd examples/distributed/minGPT-ddp
pip3 install -r requirements.txt
pip3 install numpy
Thanks to the shared root mechanism, running the command once synchronizes the packages across all other worker nodes.
Note: In production environments, we recommend using conda environments or containers to create the training environment instead of installing packages globally.
Step 3: Edit the SLURM script file.
vi mingpt/slurm/sbatch_run.sbatch
Note: Update the path to main.py in the sbatch_run.sh file to point to the actual main.py in the mingpt folder.
Step 4: Run the sample SLURM job.
sbatch mingpt/slurm/sbatch_run.sh
Step 5: Check results.
squeue
scontrol show job job_id
cat log.out
3. SLURM cluster custom resource parameter descriptions
In section 2, we covered the most important parameters. This section describes all attributes defined for a SLURM cluster in more detail. You can also read the comments in the values.yaml file of the downloaded SLURM cluster custom resource for more information.
| Attribute | Example value | Description |
|---|---|---|
| clusterName | "fpt-hpc" | Cluster name (do not change). |
| k8sNodeFilters | N/A | Divides the K8s cluster into two lists: GPU nodes (for deploying SLURM workers) and non-GPU nodes for other components. If the cluster has only GPU nodes, both lists can be the same. |
| volumeSources | See values.yaml | Defines the PVCs used by containers representing SLURM components (worker, login, controller nodes, etc.). |
| periodicChecks | N/A | A periodic job that checks the health of each node. If a GPU node has issues, it drains that node. |
| slurmNodes | N/A | Defines the count and configuration of component nodes in the SLURM cluster (login, worker, etc.). |
| slurmNodes.accounting | enabled: true, mariadbOperator: ... | Configures the accounting node. We use the MariaDB Operator to create the database. An external database can also be used (see values.yaml). |
| slurmNodes.controller | size: 1, k8sNodeFilterName: "no-gpu", ... | Controller node configuration: 1 controller node with spool and jail volumes mounted. |
| slurmNodes.worker | size: 8, k8sNodeFilterName: "gpu", gpu: 8, ... | Worker node configuration: 8 worker nodes, each with 8 GPUs, with the jail (shared root space) volume mounted. |
| slurmNodes.login | size: 2, sshd port: 22, sshRootPublicKeys: [...] | Login node configuration: 2 login nodes exposing sshd via a LoadBalancer service, using public keys for root user, and with volumes similar to controller and worker nodes. |
| slurmNodes.exporter | enabled: true, size: 1, ... | Installs node exporter for monitoring. |
4. Common use cases
4.1 Add/manage users and login
Add a user
To add an SSH key for root, edit the SLURM cluster CR:
kubectl edit SlurmCluster fpt-hpc -n fpt-hpc
In the login node configuration section, navigate to sshRootPublicKeys and add your desired public key.
To add a regular user, follow the same process as adding a user to a Linux host:
sudo adduser user_name
Modify login
By default, the login node is exposed via a public Load Balancer, which may not suit some requirements. You can change the LB type to private, use port-forwarding to access the SLURM cluster, or customize it through the portal and our LB nodes.
4.2 Scale worker nodes up and down
To change the number of worker nodes or other node types, edit the SLURM cluster CR:
kubectl edit SlurmCluster fpt-hpc -n fpt-hpc
Navigate to the worker node configuration, go to size, and change the number of worker nodes as needed.
Notes:
- When scaling up, new nodes are automatically added to the worker node list in the SLURM controller node and are ready to run jobs.
- When scaling down, you must manually delete nodes from the SLURM controller:
scontrol delete nodeName=node_name_to_delete
- The node list in a cluster is always
worker-[0, (size - 1)].
4.3 Migrate the SLURM cluster to another K8s cluster
Thanks to the flexibility of K8s and network file storage, you can easily migrate a SLURM cluster from one K8s cluster to another. Simply remount and recreate the jail-pvc on the new SLURM K8s cluster, then follow the SLURM K8s creation steps again.
4.4 Mount external volumes into the SLURM cluster
To mount a volume into the SLURM cluster, create the volume first, then deploy it as a PV and PVC in K8s. The following example uses dynamic provisioning (for production environments, we recommend static provisioning for data safety).
Step 1: Create the PVC.
apiVersion: v1
kind: PersistentVolumeClaim
metadata:
  name: jail-submount-mlperf-sd-pvc
spec:
  storageClassName: default
  accessModes:
    - ReadWriteMany
  resources:
     requests:
        storage: 100Gi
Step 2: Declare this volume in the SLURM cluster by editing the volumeSource field in the SLURM cluster CR.
kubectl edit SlurmCluster fpt-hpc -n fpt-hpc
volumeSources:
  - name: controller-spool
    persistentVolumeClaim:
      claimName: "controller-spool-pvc"
      readOnly: false
  - name: jail
    persistentVolumeClaim:
      claimName: "jail-pvc"
      readOnly: false
  - name: mlperf-sd
    persistentVolumeClaim:
      claimName: "jail-submount-mlperf-sd-pvc"
      readOnly: false
Step 3: Mount the volumes into login and worker nodes in the SLURM cluster.
On the login node:
volumes:
      jail:
        volumeSourceName: "jail"
      jailSubMounts:
        - name: "mlcommons-sd-bench-data"
          mountPath: "/mnt/data-hps"
          volumeSourceName: "mlperf-sd"
On the worker node:
volumes:
      spool:
        volumeClaimTemplateSpec:
          storageClassName: "xplat-nfs"
          accessModes: ["ReadWriteOnce"]
          resources:
            requests:
              storage: "120Gi"
      jail:
        volumeSourceName: "jail"
      jailSubMounts:
        - name: "mlcommons-sd-bench-data"
          mountPath: "/mnt/data-hps"
          volumeSourceName: "mlperf-sd"
Note: The mount path must be the same on both worker nodes and login nodes.
4.5 Using Docker
In HPC environments, container runtimes such as Apptainer and Enroot&Pyxis are preferred over Docker. However, these runtimes are less convenient for building and pushing images, or even running (Docker is not recommended for SLURM), for users familiar with Docker.
To support these users, we have installed Docker in the shared root volume of the SLURM cluster so every node in the cluster can use Docker. However, this requires jobs to use all node resources since jobs launched via Docker cannot be resource-limited like Apptainer.
We recommend users always add -N and --exclusive to grant all node resources to Docker-launched jobs.
4.6 Using SSH
In earlier versions of the SLURM Operator, users could only access worker nodes by shelling directly into them via kubectl.
Starting from version 2.0.0, the SLURM Operator supports SSH on worker nodes instead of requiring kubectl shell access. User accounts on worker nodes are synchronized with login nodes.
For login nodes, by default when SSHing to the load balancer IP, the load balancer routes the SSH session to a random login node.
If you use SSH tools such as Tmux and always want to SSH to a specific node, use:
ssh -J username@public_endpoint username@login-number -i path_to_private_key