strongSwanの接続
このガイドでは、FPT Smart CloudのVPN Site-to-SiteサービスにVPN S2S接続するルーターデバイスの構築方法を説明します。
- ステップ1: strongSwanの構築
- ステップ2: VPN Site-to-Siteの設定
- ステップ3: strongSwanの設定
事前に以下の条件を満たしていることを確認してください。
- ポータル上でVPNaaSが設定済みであること
- strongSwan 5.9.14 がインストールされたUbuntu 20.04
- パブリックIP(簡略化のためFloating IPを使用せず、VMに直接割り当て)
- デバッグ用のPfSense VM(任意)
ステップ1: strongSwanの構築
注意: strongSwanの構築には、方法1.1または方法1.2のいずれか一方のみを実施してください。
1.1: ソースからstrongSwan 5.9.14を構築する(技術の完全な習得を目的とする場合)
- Horizonで、ユーザーのキーペアと任意のプロバイダーネットワークを使用してイメージからVMを作成します。
- 以下のパッケージをインストールします。
Copyapt-get update
apt-get install vim git wget traceroute ngrep net-tool gcc g++ libgmp-dev build-essential devscripts debhelper dh-make autoconf automake libtool checkinstall nmap curl
- 以下のリンクからstrongSwanのソースをダウンロードします。
Copywget https://github.com/strongswan/strongswan/releases/download/5.9.14/strongswan-5.9.14.tar.gz
tar -xzvf strongswan-5.9.14.tar.gz
cd strongswan-5.9.14/
- ソースコードのconfigureとビルドを実行します。
Copy./configure --prefix=/usr --sysconfdir=/etc
make
checkinstall
1.2: リポジトリからstrongSwanをインストールする
Copyapt-get update
apt install strongswan strongswan-pki
ステップ2: VPN Site-to-Siteの設定
https://console.fptcloud.com/ にアクセスしてVPN Site-to-Site接続を作成します。
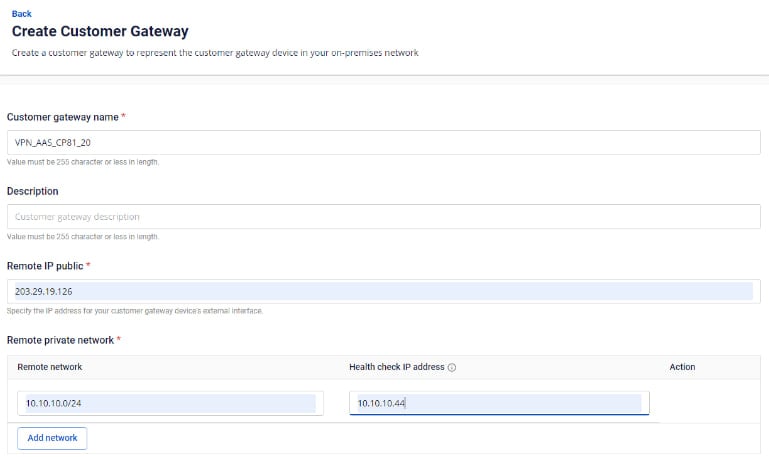
- Customer Gatewayを作成します。
- Remote private network: strongSwan側からピアリングするLANサブネットの範囲
- Remote IP public: strongSwanのパブリックIP
- VPN Connectionを作成します。 VPN Connectionのパラメーターは3つの主要セクションで構成されます。
- General information(接続の基本情報)
- Remote VPN Information(暗号化設定およびお客様側情報)
- Dead Peer Detection(接続問題発生時の自動リトライ回数)
セクション1: General information 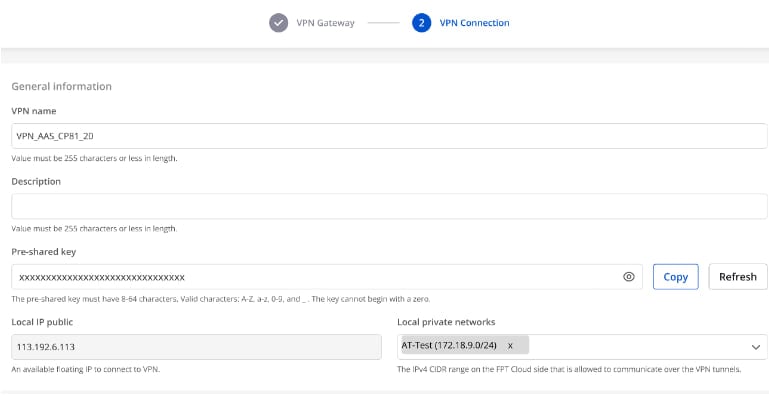
セクション2: Remote VPN information

Providers = "others" を選択し、以下の手順に従ってください。
- ステップ1: providers name = "StrongSwan" を入力します。
- ステップ2: IKEおよびIPSecの設定を以下のとおり入力します。
IKEの設定:
- Authorization algorithm: sha256
- Encryption algorithm: aes 256
- IKE version: ikev2
- DH group: group14
- Lifetime: 3600 seconds
- Phase 1 negotiation mode: main
IPSecの設定:
- Authorization algorithm: sha256
- Encryption algorithm: aes 256
- Encapsulation mode: tunnel
- Transform protocol: esp
- Perfect Forward Secrecy (PFS): group14
- Lifetime: 3600 seconds
セクション3: Dead Peer Detection
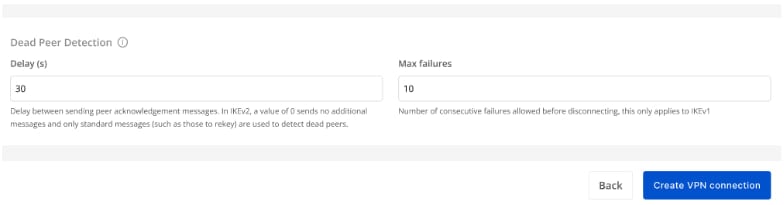
すべての情報を入力したら、Create VPN Connection を選択します。
ステップ3: strongSwanの設定
- 上記で作成したキーを使用してUbuntuにSSH接続します。
- ユーザー「ubuntu」でVMのIPアドレスにSSH接続します。
strongSwan VPNの設定
以下のコマンドを実行します(パラメーターは実際の値に置き換えてください)。
CopystrongSwanのバージョン確認
swanctl -v
以下のテンプレートを参考に /etc/ipsec.conf を編集します。
Copyconfig setup
        charondebug="all"
        uniqueids=yes

conn myvpn
    type=tunnel
    auto=start
    keyexchange=ikev2
    ike=aes256-sha256-modp2048
    keyingtries=%forever
    lifetime=3600s
    dpddelay=30s
    dpdtimeout=120s
    dpdaction=restart
    esp=aes256-sha256-modp2048
    left=x.x.x.x    //strongSwanのIP
    leftsubnet=x.x.x.x/24 //strongSwanのサブネット
    leftauth=psk
    right=x.x.x.x    // リモートピアのIP
    rightsubnet=x.x.x.x/24 //リモートピアのサブネット
    rightauth=psk
    authby=secret
    auto=start
以下のテンプレートを参考に /etc/ipsec.secret を編集します。
Copy# This file holds shared secrets or RSA private keys for authentication.
x.x.x.x x.x.x.x : PSK "xxxxxxxxxxxxxxxxxxxxxxxxxxxxxxxxxxx"   // Pre-shared key
- 注意事項:
- strongSwanはUbuntu上でバックグラウンドサービスとして動作します。最高のパフォーマンスを発揮するために、CPUでマルチネットワークを有効にしてください。
- strongSwanはUbuntu上でバックグラウンドサービスとして動作します。接続を許可するためにファイアウォールとルーティングを有効にしてください。
- FCIのOpenStack上で動作させる場合は、Destination にピアのIPを、nexthopにstrongSwanのLAN IPを設定したルーターの Static route を追加してください。