Connect strongSwan
This guide explains how to build a Router device to connect VPN S2S with the FPT Smart Cloud VPN Site-to-Site service.
- Step 1: Build strongSwan/
- Step 2: Configure VPN Site-to-Site/
- Step 3: Configure strongSwan/
Ensure the following prerequisites are met:
- VPNaaS on the Portal
- Ubuntu 20.04 downloaded and installed with: strongSwan 5.9.14
- A public IP — for simplicity, assign it directly to the VM rather than using a Floating IP
- One PfSense VM for debugging (optional)
Step 1: Build strongSwan
Note: To build strongSwan, choose either method 1.1 or method 1.2.
1.1: Build strongSwan 5.9.14 from source (for full technology ownership)
- On Horizon, create a VM from the image using your user keypair and any provider network.
- Install the following packages:
Copyapt-get update
apt-get install vim git wget traceroute ngrep net-tool gcc g++ libgmp-dev build-essential devscripts debhelper dh-make autoconf automake libtool checkinstall nmap curl
- Download strongSwan source from the following link:
Copywget https://github.com/strongswan/strongswan/releases/download/5.9.14/strongswan-5.9.14.tar.gz
tar -xzvf strongswan-5.9.14.tar.gz
cd strongswan-5.9.14/
- Configure and build the source code:
Copy./configure --prefix=/usr --sysconfdir=/etc
make
checkinstall
1.2: Install strongSwan from repository
Copyapt-get update
apt install strongswan strongswan-pki
Step 2: Configure VPN Site-to-Site
Go to https://console.fptcloud.com/ and create a VPN Site-to-Site connection.
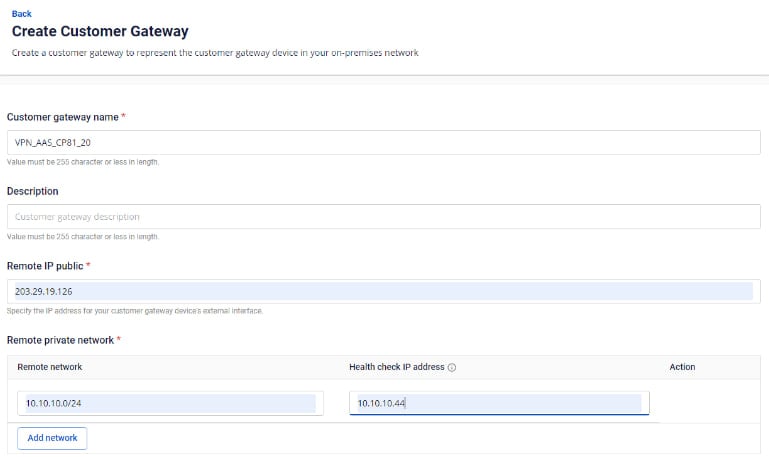
- Create a Customer Gateway:
- Remote private network: the LAN Subnet range to peer with from strongSwan.
- Remote IP public: the public IP of strongSwan.
- Create a VPN Connection: The VPN Connection parameters consist of three main sections:
- General information (general connection details)
- Remote VPN Information (encryption settings and customer-side information)
- Dead Peer Detection (number of automatic retries when a connectivity issue occurs)
Section 1: General information 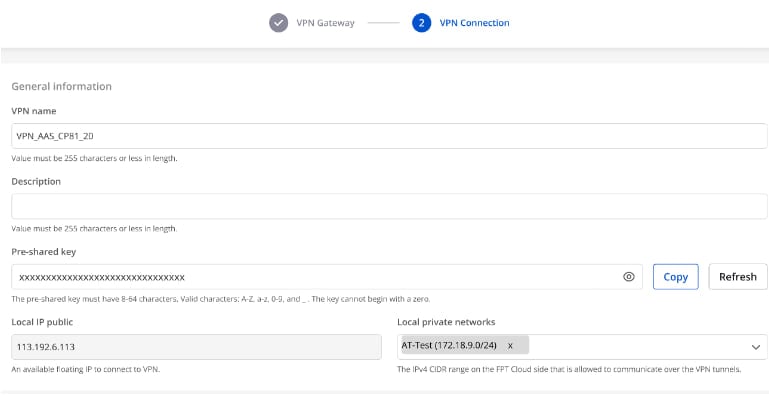
Section 2: Remote VPN information
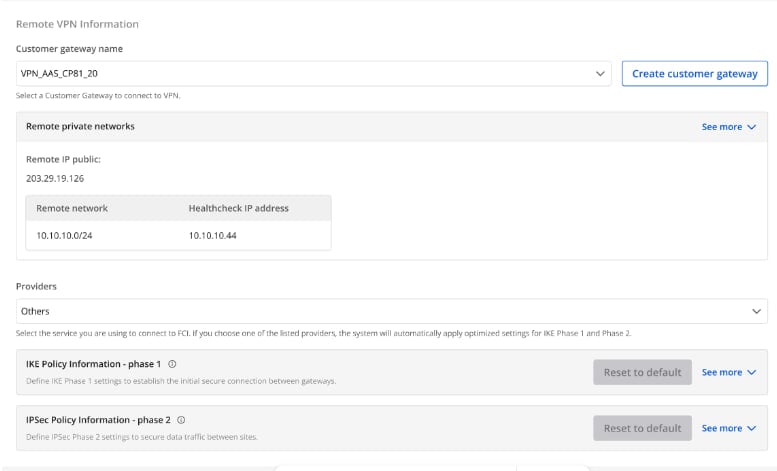
Select Providers = "others", then follow these steps:
- Step 1: Enter providers name = "StrongSwan".
- Step 2: Enter the IKE and IPSec settings as follows:
For IKE:
- Authorization algorithm: sha256
- Encryption algorithm: aes 256
- IKE version: ikev2
- DH group: group14
- Lifetime: 3600 seconds
- Phase 1 negotiation mode: main
For IPSec:
- Authorization algorithm: sha256
- Encryption algorithm: aes 256
- Encapsulation mode: tunnel
- Transform protocol: esp
- Perfect Forward Secrecy (PFS): group14
- Lifetime: 3600 seconds
Section 3: Dead Peer Detection

After filling in all the information, select Create VPN Connection.
Step 3: Configure strongSwan
- SSH into Ubuntu using the key created above.
- SSH to the VM IP address with user: "ubuntu".
Configure strongSwan VPN
Run the following commands (replace parameters with your actual values):
CopyCheck strongSwan version
swanctl -v
Edit the file /etc/ipsec.conf using the following template:
Copyconfig setup
        charondebug="all"
        uniqueids=yes

conn myvpn
    type=tunnel
    auto=start
    keyexchange=ikev2
    ike=aes256-sha256-modp2048
    keyingtries=%forever
    lifetime=3600s
    dpddelay=30s
    dpdtimeout=120s
    dpdaction=restart
    esp=aes256-sha256-modp2048
    left=x.x.x.x    //IP of strongSwan
    leftsubnet=x.x.x.x/24 //Subnet of strongSwan
    leftauth=psk
    right=x.x.x.x    // IP of the remote peer
    rightsubnet=x.x.x.x/24 //Subnet of the remote peer
    rightauth=psk
    authby=secret
    auto=start
Edit the file /etc/ipsec.secret using the following template:
Copy# This file holds shared secrets or RSA private keys for authentication.
x.x.x.x x.x.x.x : PSK "xxxxxxxxxxxxxxxxxxxxxxxxxxxxxxxxxxx"   // Pre-shared key
- Notes:
- strongSwan runs as a background service on Ubuntu. Enable multi-network on the CPU for best performance.
- strongSwan runs as a background service on Ubuntu. Enable the firewall and routing to allow connectivity.
- If running on FCI's OpenStack, add a Static route on the router with the Destination set to the peer's IP and the nexthop set to the LAN IP of strongSwan.