Installing and initializing a GPU Kubernetes cluster
FPT Cloud supports the following GPU cards:
- Hanoi and SGN regions: GPU A30
- Hanoi 2 and Japan regions: GPU A30, H100 SXM5, H200 SXM5
Prerequisites:
- CPU, GPU, RAM, Storage, and Instance quota sufficient for the desired Kubernetes cluster configuration. If you want to use Autoscale, the GPU quota must cover the maximum number of desired nodes (pay attention to the Min node and Max node settings).
- One network subnet: the network used for Kubernetes nodes must have a Static IP Pool.
Steps to initialize a GPU cluster
1. GPU A30
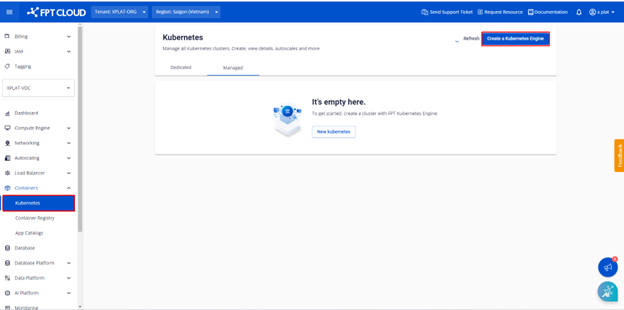
Step 1: Access the FPT Cloud portal at console.fptcloud.com, navigate to the Kubernetes section, and click "Create a Kubernetes Engine".
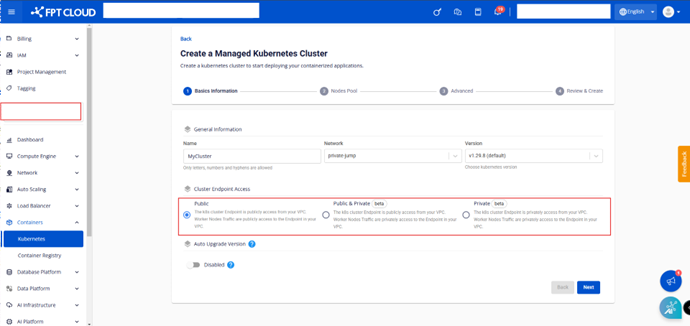
Step 2: Enter the basic cluster information and click the button.
1.1. Basics Information:
-
Name: Enter the cluster name.
-
Network: Subnet used to deploy the Virtual Machines (VMs) of the Kubernetes cluster.
-
Version: Select the Kubernetes cluster version.
-
Cluster Endpoint Access: Choose how the Kubernetes cluster endpoint is accessed.
- Public: The k8s cluster's API server endpoint is accessible from the public internet. Connections from worker nodes to the API server go through the public network.
- Public & Private: The k8s cluster's API server endpoint is accessible from the public internet. Connections from worker nodes to the API server go through the private network.
- Private: The k8s cluster's API server endpoint is only accessible privately within the VPC. Connections from worker nodes to the API server go through the private network.
How to choose the right cluster endpoint:
- Public: Use this option if you need to access the Kubernetes API endpoint from outside the VPC.
- Public & Private: Use when you need the endpoint to be publicly accessible and want to whitelist IP addresses for the API server endpoint.
- Private: Use when access to the endpoint is only needed within the VPC.

- You should select a Cluster Endpoint Access mode that matches your security requirements and network architecture.
- If you select Public & Private or Private, an additional "Allow CIDR" field will appear where you can enter the list of IP address ranges allowed to access the Kubernetes cluster endpoint.
About Allow CIDR:
- CIDR (Classless Inter-Domain Routing) is a format for specifying the IP address ranges that are allowed to access the Kubernetes API endpoint.
- If left blank, the default is
0.0.0.0/0, meaning the endpoint can be accessed from any IP address. - If you enter a specific value (for example
192.168.1.0/24), only IPs in the range192.168.1.0 – 192.168.1.255will be able to access it.
For high security, restrict the CIDR to internal IP ranges rather than using 0.0.0.0/0.
Step 3: Enter the Kubernetes cluster configuration. In addition to the standard Kubernetes settings, you need to configure the GPU options in the Worker Group:
- Select instance type: GPU
- Select GPU type: Nvidia Tesla A30
- Select the GPU sharing configuration
- Select the GPU type configuration (CPU / RAM / GPU RAM)
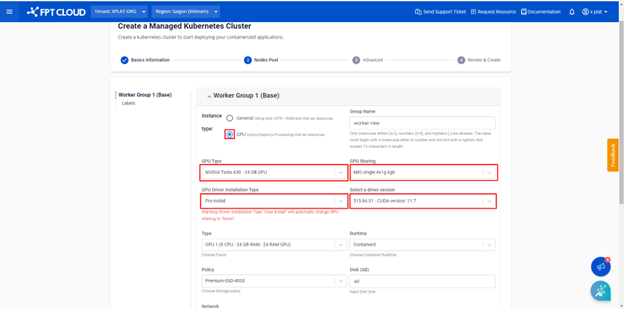
- Under "GPU Driver Installation Type" there are two options: Pre-install and User-install.
- A driver is a program that allows the operating system to communicate with the hardware — specifically between the worker's OS (Windows, Ubuntu, etc.) and the GPU. The OS cannot use the GPU without a driver.
- For Pre-install, the NVIDIA GPU driver will be added to your cluster automatically.
- For User-install, you can manually install the GPU driver to choose the appropriate driver version.
Step 4: Click Create and review the initialization information.
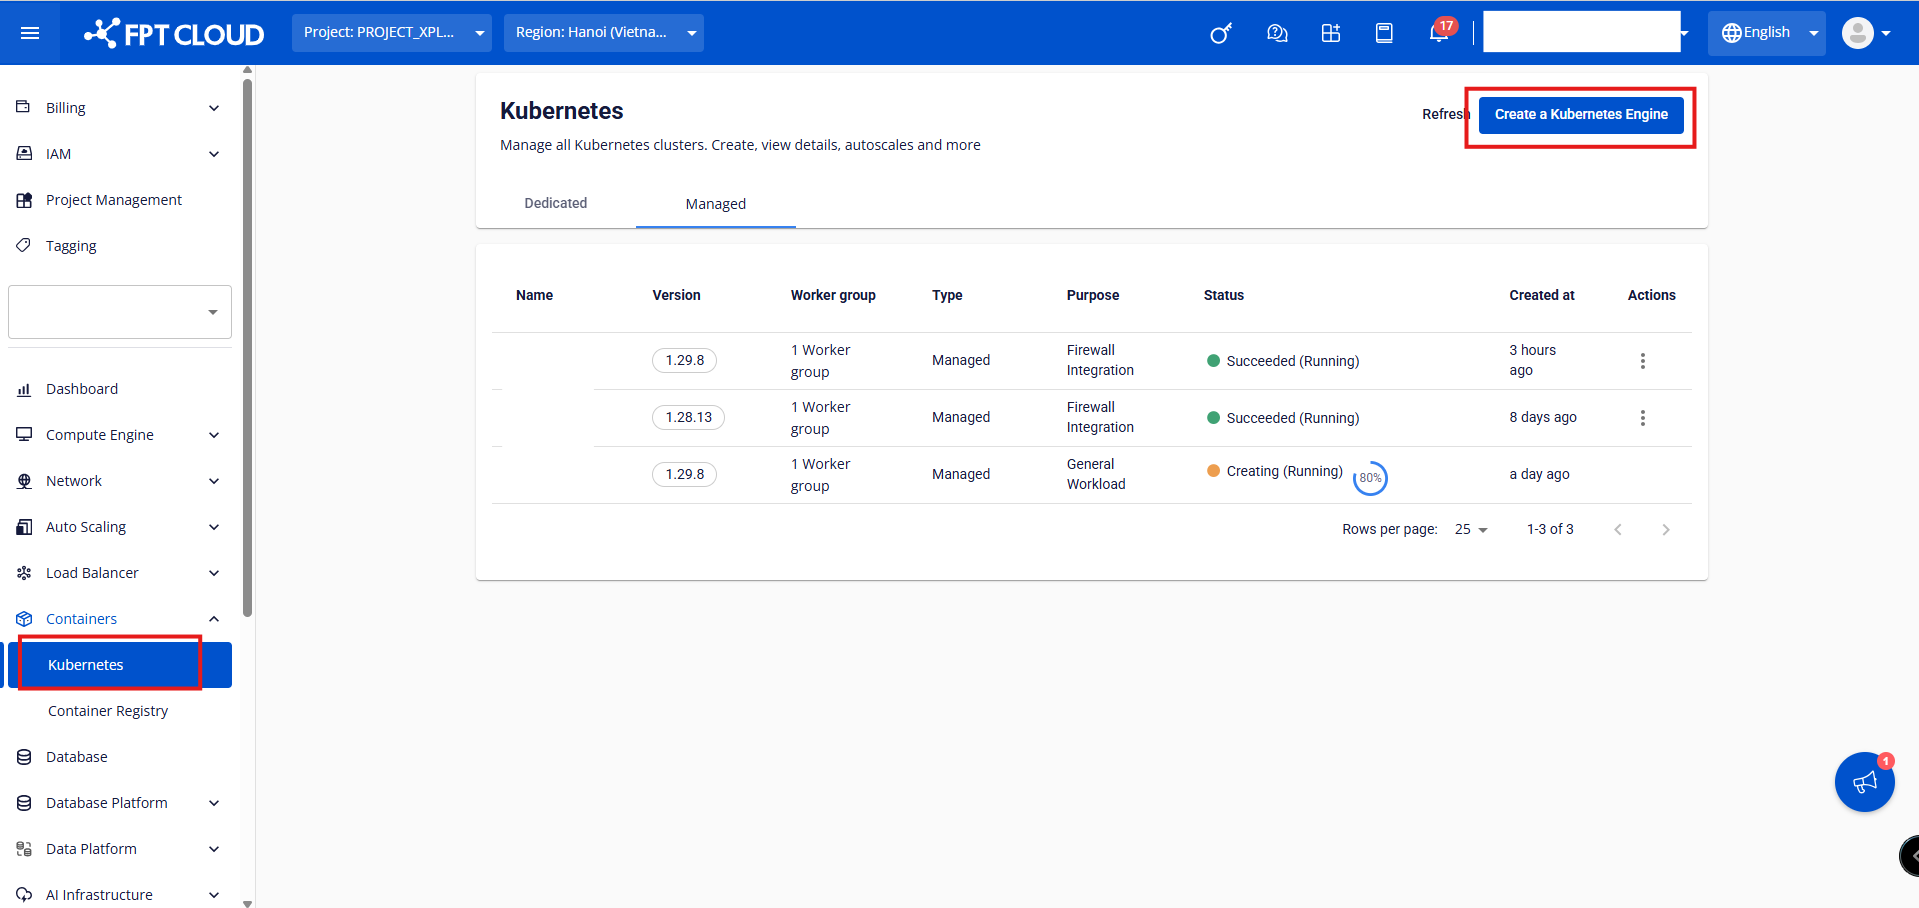
Step 5: Monitor the Kubernetes cluster initialization status. Once the status is Succeeded (Running), proceed to deploy your applications.
2. GPU H100 SXM5
Step 1: In the FPT Portal menu, go to Containers > Kubernetes > Create a Kubernetes Engine.
Step 2: Enter the basic cluster information and click the button.
1.1. Basics Information:
- Name: Enter the cluster name.
- Network: Subnet used to deploy the Virtual Machines (VMs) of the Kubernetes cluster.
- Version: Select the Kubernetes cluster version.
- Cluster Endpoint Access: Choose how the Kubernetes cluster endpoint is accessed.
Step 3: Configure the Node Pools as needed and click the button.
For the H100 card, the portal does not support creating a GPU worker as the base worker group. Please create the GPU worker group starting from worker group 2.
-
Base Worker Group:
- Instance Type: Select General instance type
- Type: Select the configuration (CPU & Memory) for the worker nodes
- Container Runtime: Select Containerd
- Policy: Select the Storage Policy (corresponding to IOPS) for the worker node disk
- Disk: Select the root disk size for the worker nodes
- Scale min: Minimum number of worker node VM instances for the k8s cluster. Minimum recommended is 3 nodes for production environments.
- Scale max: Maximum number of worker node VM instances for a worker group in the k8s cluster.
- Label: Add labels to the worker group
-
Worker Group n:
- Select instance type: GPU
- Select GPU type: Nvidia H100 SXM5
- Select the GPU sharing configuration
- Select the GPU type configuration (CPU / RAM / GPU RAM)
- Under "GPU Driver Installation Type" there are two options: Pre-install and User-install.
- A driver is a program that allows the operating system to communicate with the hardware — specifically between the worker's OS and the GPU. The OS cannot use the GPU without a driver.
- For Pre-install, the NVIDIA GPU driver will be added to your cluster automatically.
- For User-install, you can manually install the GPU driver to choose the appropriate driver version.
Step 4: Click Create and review the initialization information.
Step 5: Monitor the Kubernetes cluster initialization status. Once the status is Succeeded (Running), proceed to deploy your applications.
3. GPU H200 SXM5
Step 1: In the FPT Portal menu, go to Containers > Kubernetes > Create a Kubernetes Engine.
Step 2: Enter the basic cluster information and click the button.
1.1. Basics Information:
- Name: Enter the cluster name.
- Network: Subnet used to deploy the Virtual Machines (VMs) of the Kubernetes cluster.
- Version: Select the Kubernetes cluster version.
- Cluster Endpoint Access: Choose how the Kubernetes cluster endpoint is accessed.
- You should select a Cluster Endpoint Access mode that matches your security requirements and network architecture.
- If you select Public & Private or Private, an additional "Allow CIDR" field will appear where you can enter the list of IP address ranges allowed to access the Kubernetes cluster endpoint.
Step 3: Configure the Node Pools as needed and click the button.
For the H200 card, the portal does not support creating a GPU worker as the base worker group. Please create the GPU worker group starting from worker group 2.
-
Base Worker Group:
- Instance Type: Select General instance type
- Type: Select the configuration (CPU & Memory) for the worker nodes
- Container Runtime: Select Containerd
- Policy: Select the Storage Policy (corresponding to IOPS) for the worker node disk
- Disk: Select the root disk size for the worker nodes
- Scale min: Minimum number of worker node VM instances for the k8s cluster. Minimum recommended is 3 nodes for production environments.
- Scale max: Maximum number of worker node VM instances for a worker group in the k8s cluster.
- Label: Add labels to the worker group
-
Worker Group n:
- Select instance type: GPU
- Select GPU type: Nvidia H200 SXM5
- Select the GPU sharing configuration
- Select the GPU type configuration (CPU / RAM / GPU RAM)
- Under "GPU Driver Installation Type" there are two options: Pre-install and User-install.
- A driver is a program that allows the operating system to communicate with the hardware — specifically between the worker's OS and the GPU. The OS cannot use the GPU without a driver.
- For Pre-install, the NVIDIA GPU driver will be added to your cluster automatically.
- For User-install, you can manually install the GPU driver to choose the appropriate driver version.
Step 4: Click Create and review the initialization information.
Step 5: Monitor the Kubernetes cluster initialization status. Once the status is Succeeded (Running), proceed to deploy your applications.