Creating a database
The Create database feature allows you to quickly deploy various databases on the FPT Database Engine platform without detailed physical infrastructure configuration. Creating a new database cluster requires you to enter configurations related to the engine type, network, cluster identity, and additional services such as backup and auto-scaling. Detailed instructions are described below.
Step 1: Open the database creation screen
Access the database list page corresponding to the type of database to be created (see View database list/ for details), select Create a Database Engine or Create to begin the provisioning process. The Create New Database screen will open, allowing you to configure the parameters needed to define and deploy the database in the FPT Database Engine environment. The deployment process consists of 3 steps:
- Step 1 – Database Configuration
- Step 2 – Additional Service Configuration
- Step 3 – Review & Create
Step 2: Define database configuration
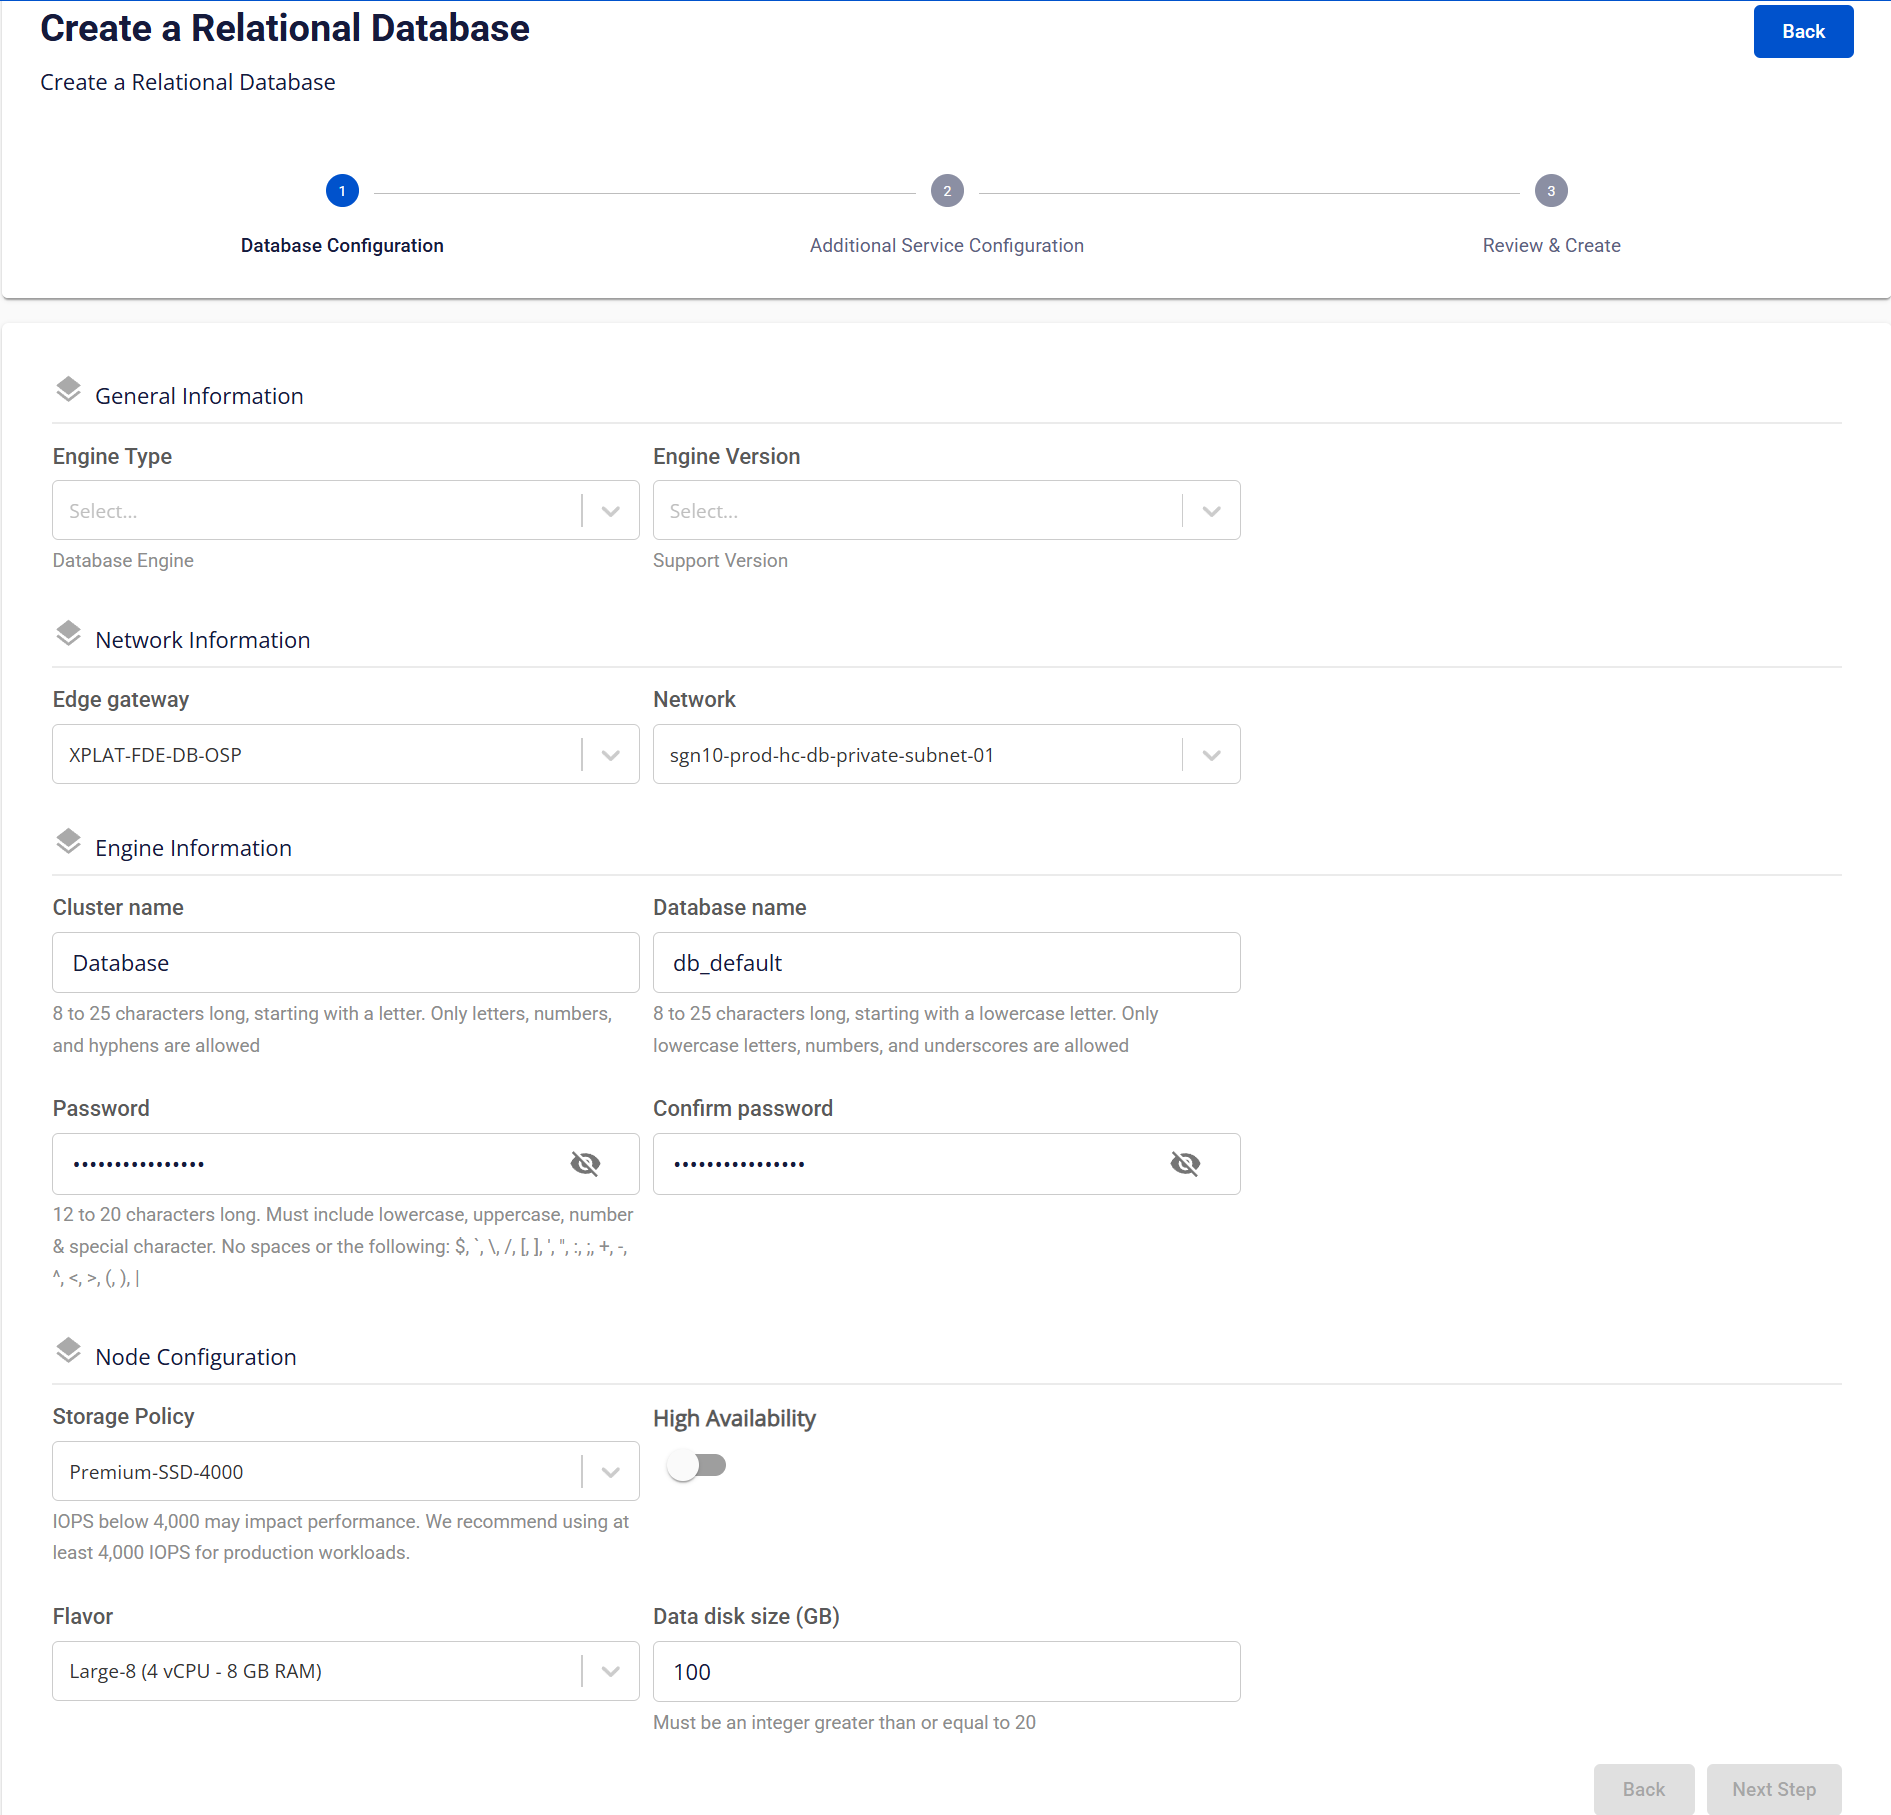
This screen is the first step in the database provisioning process, used to configure platform parameters such as engine, network, credentials, and resources. Depending on the selected engine type, some fields may differ.
Field descriptions:
1. General Information section
| Field | Description |
|---|---|
| Engine Type | Select the database type. Depending on the selected menu, the system will display corresponding options: Relational Databases show "PostgreSQL", "MySQL", "MariaDB", "SQL Server"; NoSQL shows "MongoDB", "Cassandra", "Redis"; Search Engine shows "OpenSearch"; Data Streaming shows "Kafka"; Time Series Database shows "TimescaleDB"; OLAP shows "ClickHouse". |
| Edition | Select the edition type, including "Enterprise", "Standard", "Web". This field is only displayed for Engine Type "SQL Server". |
| Engine Version | Select the engine version supported by the system according to the Database Engine version policy. |
2. Network Information section
| Field | Description |
|---|---|
| Edge Gateway | Select the Edge Gateway to route network traffic between the database and other systems. |
| Network | Select the Network/Subnet where the database instance will be deployed. This network determines the access scope and isolation level. |
3. Engine Information section
| Field | Description |
|---|---|
| Cluster Name | The identifier name for the database, 8–25 characters, only including letters, numbers, and hyphens (-). Must start with a letter. |
| Database Name | The default database name created in the cluster, 8–25 characters, only including lowercase letters, numbers, and underscores (_). Must start with a lowercase letter. Not displayed for Engine Type Redis or Kafka. |
| VHost Name | The default VHost name created in the cluster. Only displayed for Engine Type RabbitMQ. |
| Password / Confirm Password | The password for the database admin account, 8–25 characters, including uppercase, lowercase, numbers, and special characters. Must not contain spaces or the following special characters: / \ " ' < > ? % ; : $ ! [ ] { } ( ) , & + |
4. Node Configuration section
| Field | Description |
|---|---|
| Storage Policy | Select the Storage Policy that determines storage performance (IOPS). Recommend selecting IOPS ≥ 4,000 for production environments. |
| High Availability | Enable High Availability (HA) to deploy a multi-node database cluster with automatic failover. Not displayed for Engine Type Cassandra. For ClickHouse HA, enabling HA automatically creates a replica for each shard, but replication tables must be created manually. Replication is table-level and independent of sharding. |
| Number Of Nodes | Select the number of nodes for the database cluster. Only displayed for Engine Type Cassandra. |
| Flavor | Select the Flavor to determine compute resources for each node (vCPU, RAM). |
| Data Disk Size (GB) | The data disk capacity for the database, in GB, with a minimum of 20 GB. |
After entering all information, click Next Step to proceed to add-on service configuration.
Step 3: Configure add-on services
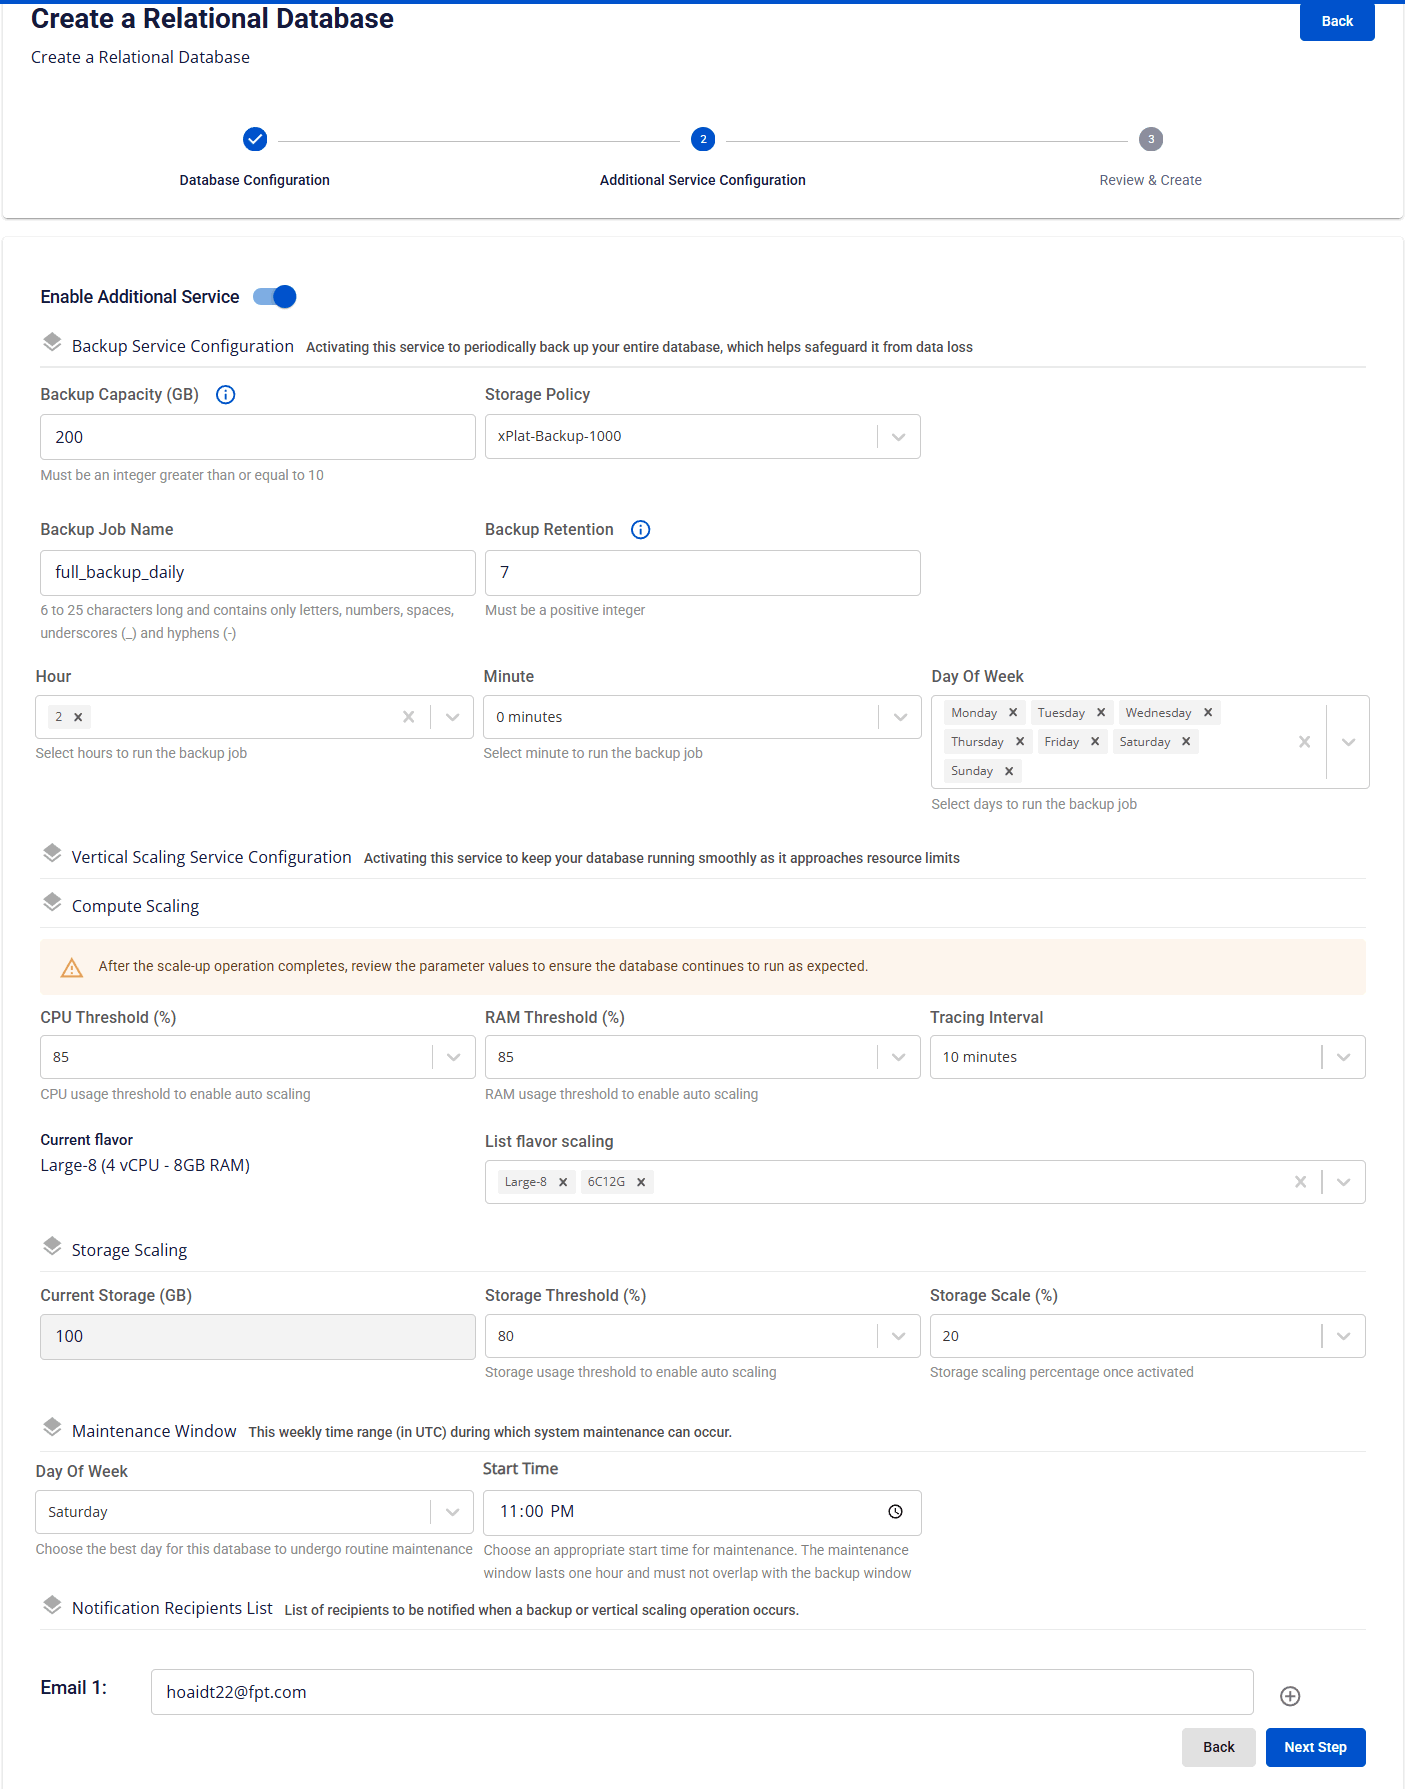
This screen allows configuring optional add-on services for the database cluster such as backup, auto-scaling, and notifications, to increase availability, scalability, and operational capability.
It is recommended to enable Backup and Auto Scaling services at provisioning time to ensure data safety, stability, and continuous system operations.
Field descriptions:
- Enable Additional Service: Enable/disable add-on services for the database cluster, including backup and auto-scaling.
- Backup Service Configuration: Enable this service for the system to perform daily full database backup.
- Vertical Scaling Service Configuration: Enable this service to allow the system to automatically expand compute or storage resources when usage thresholds are exceeded.
- Maintenance Window: Declare the time window in which the system is allowed to perform maintenance:
- Day of Week: The day of the week for maintenance, from "Monday" to "Sunday".
- Start Time: The time maintenance is allowed to begin on the selected day. Maintenance duration: 1 hour, starting from the configured Start Time.
- Notification Recipients List: Enter the list of email addresses to receive notifications when backup or scaling events occur.
After entering all information, click Next Step to proceed to review and confirm database provisioning.
Step 4: Review information & confirm provisioning
Users must review all configured information before confirming provisioning:
- If edits are needed, click "Back" to return to the previous step and update the information.
- If the information is correct, click "Create" to confirm database provisioning.
After confirmation:
- The system will check resources, display a provisioning notification, and begin deploying the new database based on the entered configuration.
- The user will be redirected to the list screen, where the newly created database will appear with "Processing" status at the top of the list.
The provisioning process typically takes 5–7 minutes. When complete, the database will transition to "Running" status and be ready to use. Note: If the provisioning process fails, please delete the failed database and re-provision.
To connect to the newly created database, see the instructions in the Connect to database/ section.