Connecting to a database
This section explains how to connect to a database deployed on FPT Database Engine using supported connection methods and operational recommendations.
After successfully creating a database cluster on FPT Database Engine, users can connect using administration tools, application drivers, or standard clients. Connectivity depends on network configuration, security policies, and database credentials.
Before connecting to a database cluster, you need to configure network and security settings to allow connections from clients. This typically includes creating security group rules and assigning a floating IP (public IP address) if connecting from outside. Once network access has been granted, you can use a client tool to log in to the database.
Creating a security group
A Security Group is a set of firewall rules used to control inbound and outbound network traffic to and from the database cluster. Each rule defines the port, protocol, and IP address/CIDR allowed to connect to the database.
Properly configuring a Security Group helps protect database connections, limits access according to the principle of least privilege, and minimizes the risk of unauthorized access from outside.
Security recommendations:
- Use a separate Security Group for each database cluster.
- Only open ports that are strictly necessary for connectivity.
- Do not share a Security Group across multiple clusters or open all ports. Overly broad configuration can unintentionally expand access scope, increase the risk of unauthorized access, and affect other clusters when rules change. In some cases, this can cause service disruptions or data leakage.
To ensure security and ease of management, create and configure a Security Group for your database cluster as follows:
Step 1: Access the security group management page
Log in to FPT Cloud Portal. From the main menu, select Network > Security Groups. The Security Group Management interface will display the list of existing security groups, along with options to create, edit, or delete a security group.
Step 2: Create a new security group
On the Security Group Management page, click Create security group. The create security group screen will appear:
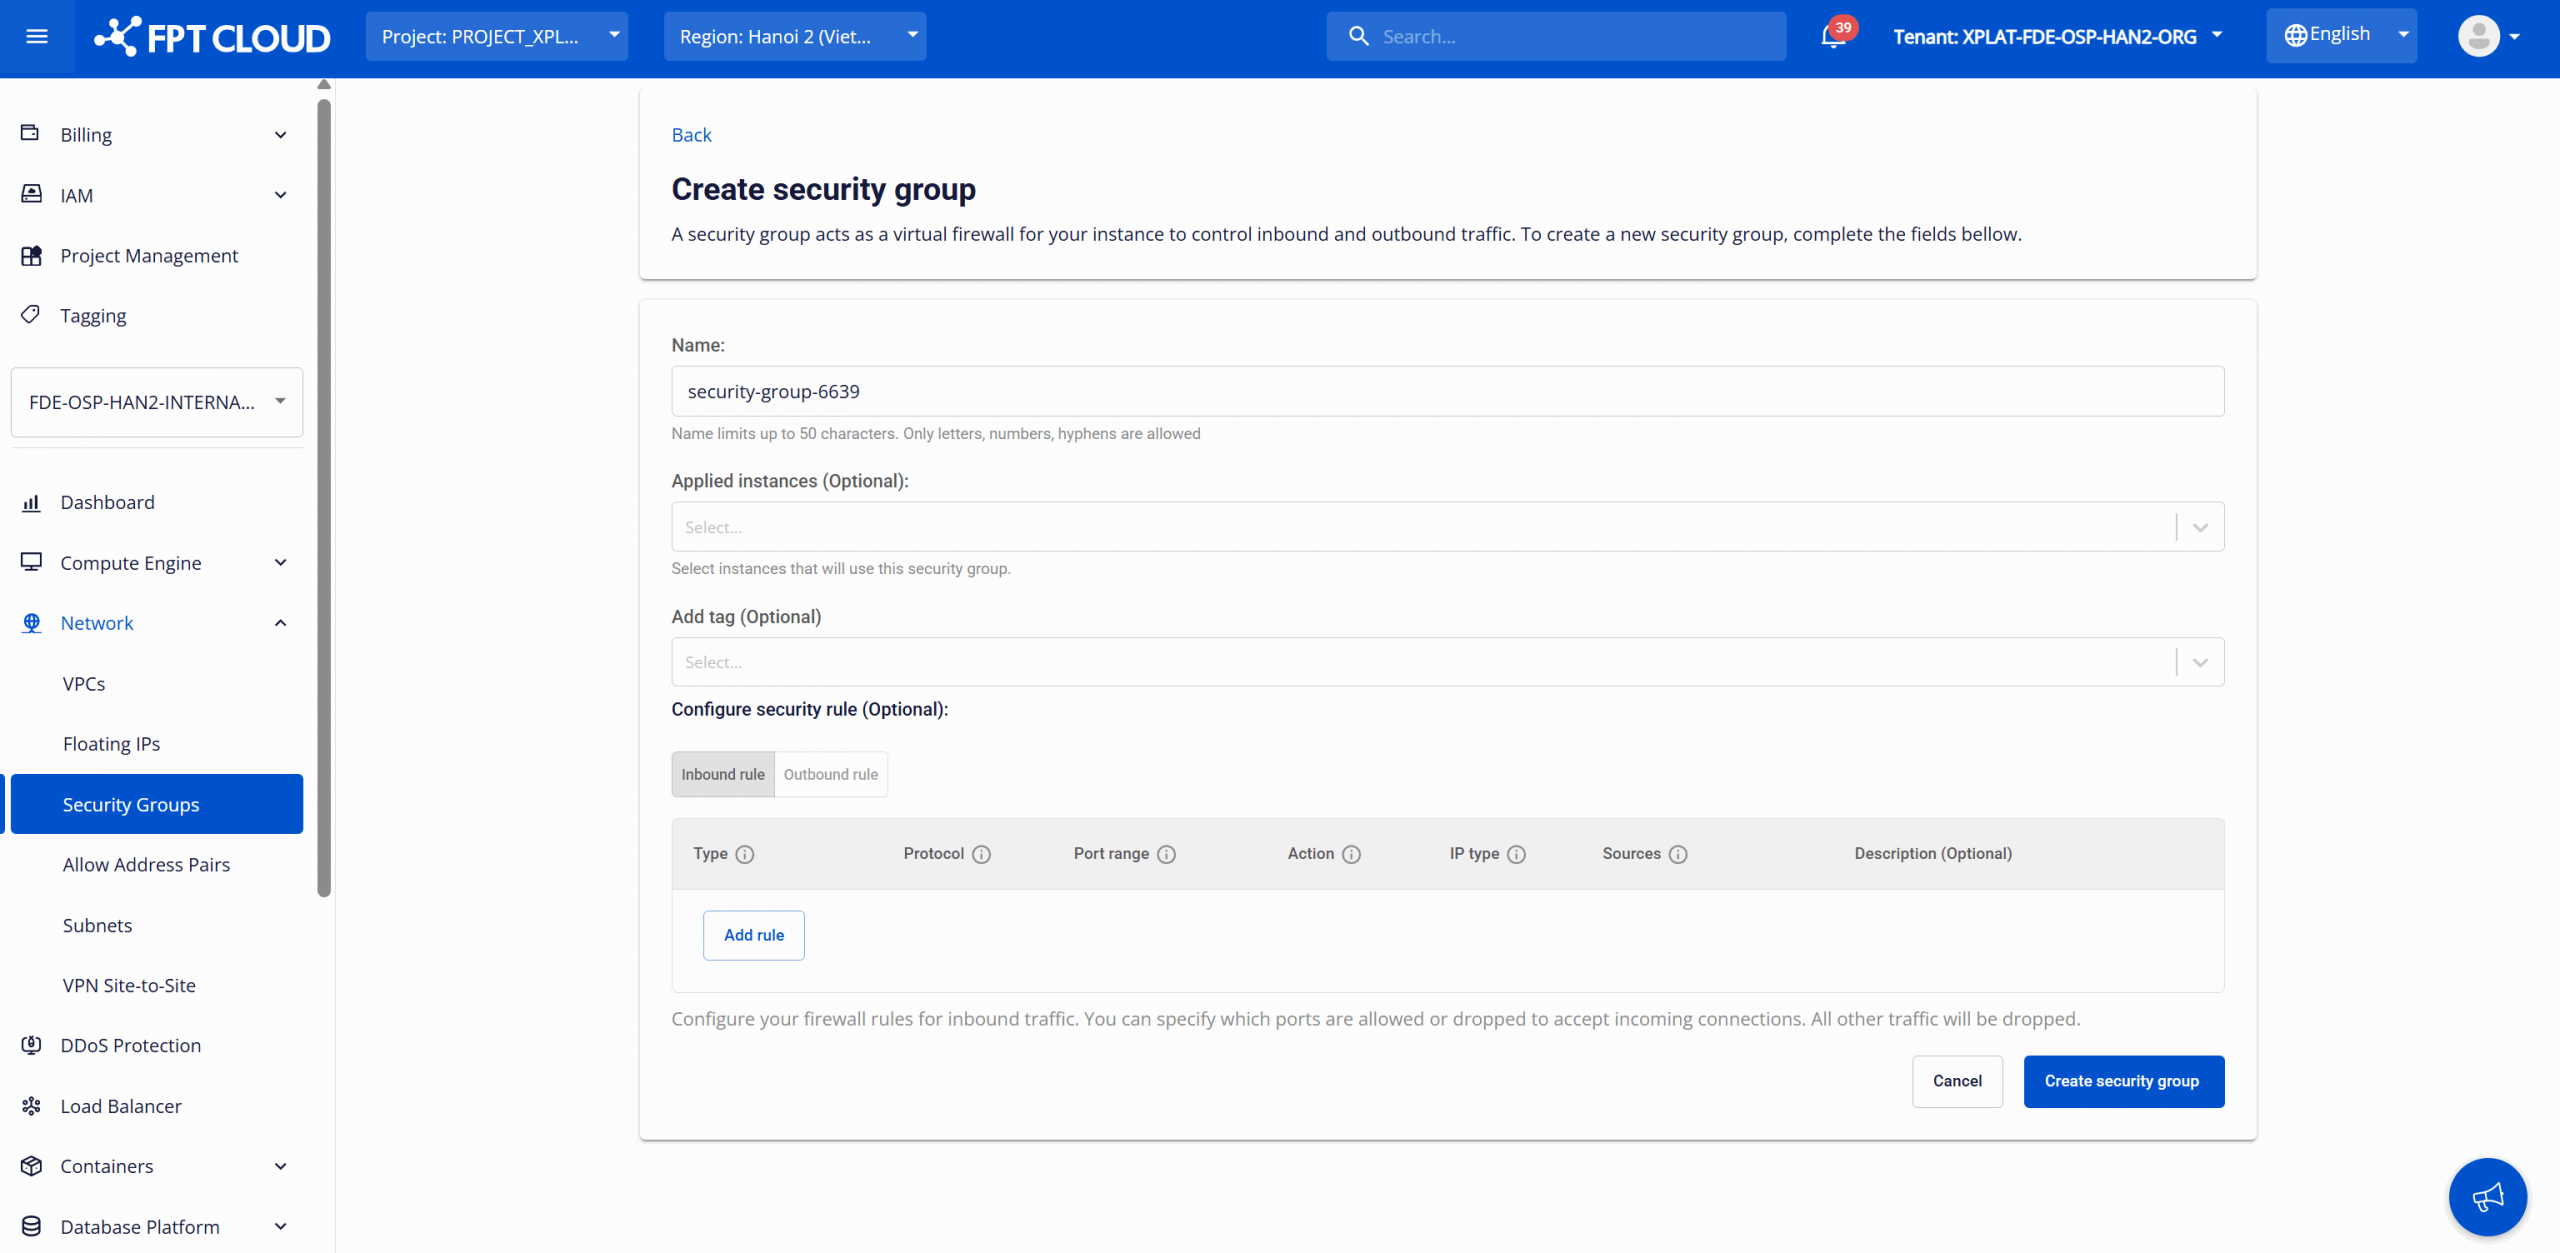
Enter the configuration information:
- Name: Enter a Security Group name for easy management. Maximum 50 characters, only letters, numbers, and hyphens (-). The system may auto-generate a default name if not specified.
- Applied Instances (optional): Select the database instance(s) the Security Group will be applied to.
- Add tag (optional): Assign tags (key-value) to the Security Group for resource classification, cost management, operations, and auditing.
- Configure security rule (optional): Set up security rules to control inbound and outbound network traffic for the database cluster.
- Inbound rules: Control connections coming into the database cluster, typically used to allow applications or users to access the database. Allowed IP addresses or CIDRs are declared in the Source field.
- Outbound rules: Control connections going out from the database cluster. Usually not required if the database only communicates within the internal network. Target IP addresses or CIDRs are declared in the Destination field.
After entering all information, click Create security group to complete the process.
Once created, the new security group will appear in the management list showing its name, the list of applied nodes, and creation time.
When needed, you can perform the following operations on a created security group:
- Rename the security group: To rename, on the Security Group Management page, click Rename for the group to edit. Make the change and click Rename to save.
- Delete the security group: To remove an unused security group, on the Security Group Management page, click Delete for the security group to remove. Confirm the action in the warning dialog to complete. Warning: Deleting a Security Group may disrupt the network connections of databases assigned to that Security Group. After deletion, all associated security rules are removed immediately, which may prevent applications from accessing the database or cause connectivity loss between internal services. Ensure the Security Group is not assigned to any resources before deleting.
Assigning a floating IP
To allow access to the database from an external network (Internet) or from outside the VPC, you need to create and assign a Floating IP to it. A Floating IP is a static public IPv4 address that can be transferred between resources without changing other configurations inside the network system. Assigning a Floating IP requires ensuring that security groups/firewall rules allow appropriate traffic (port, protocol) to reach the database.
Best practice: Only assign a Floating IP when public access is needed. If the database only serves internal backend within the VPC, consider using a private static IP to avoid exposing the service to the public network.
Step 1: Access the floating IP management page
Log in to FPT Cloud Portal. From the main menu, select Network > Floating IPs. The Floating IP Management interface will display the existing list, along with options to allocate or release a Floating IP.
Step 2: Allocate an IP address
On the Floating IP Management page, click Allocate IP address. The IP allocation dialog will appear:
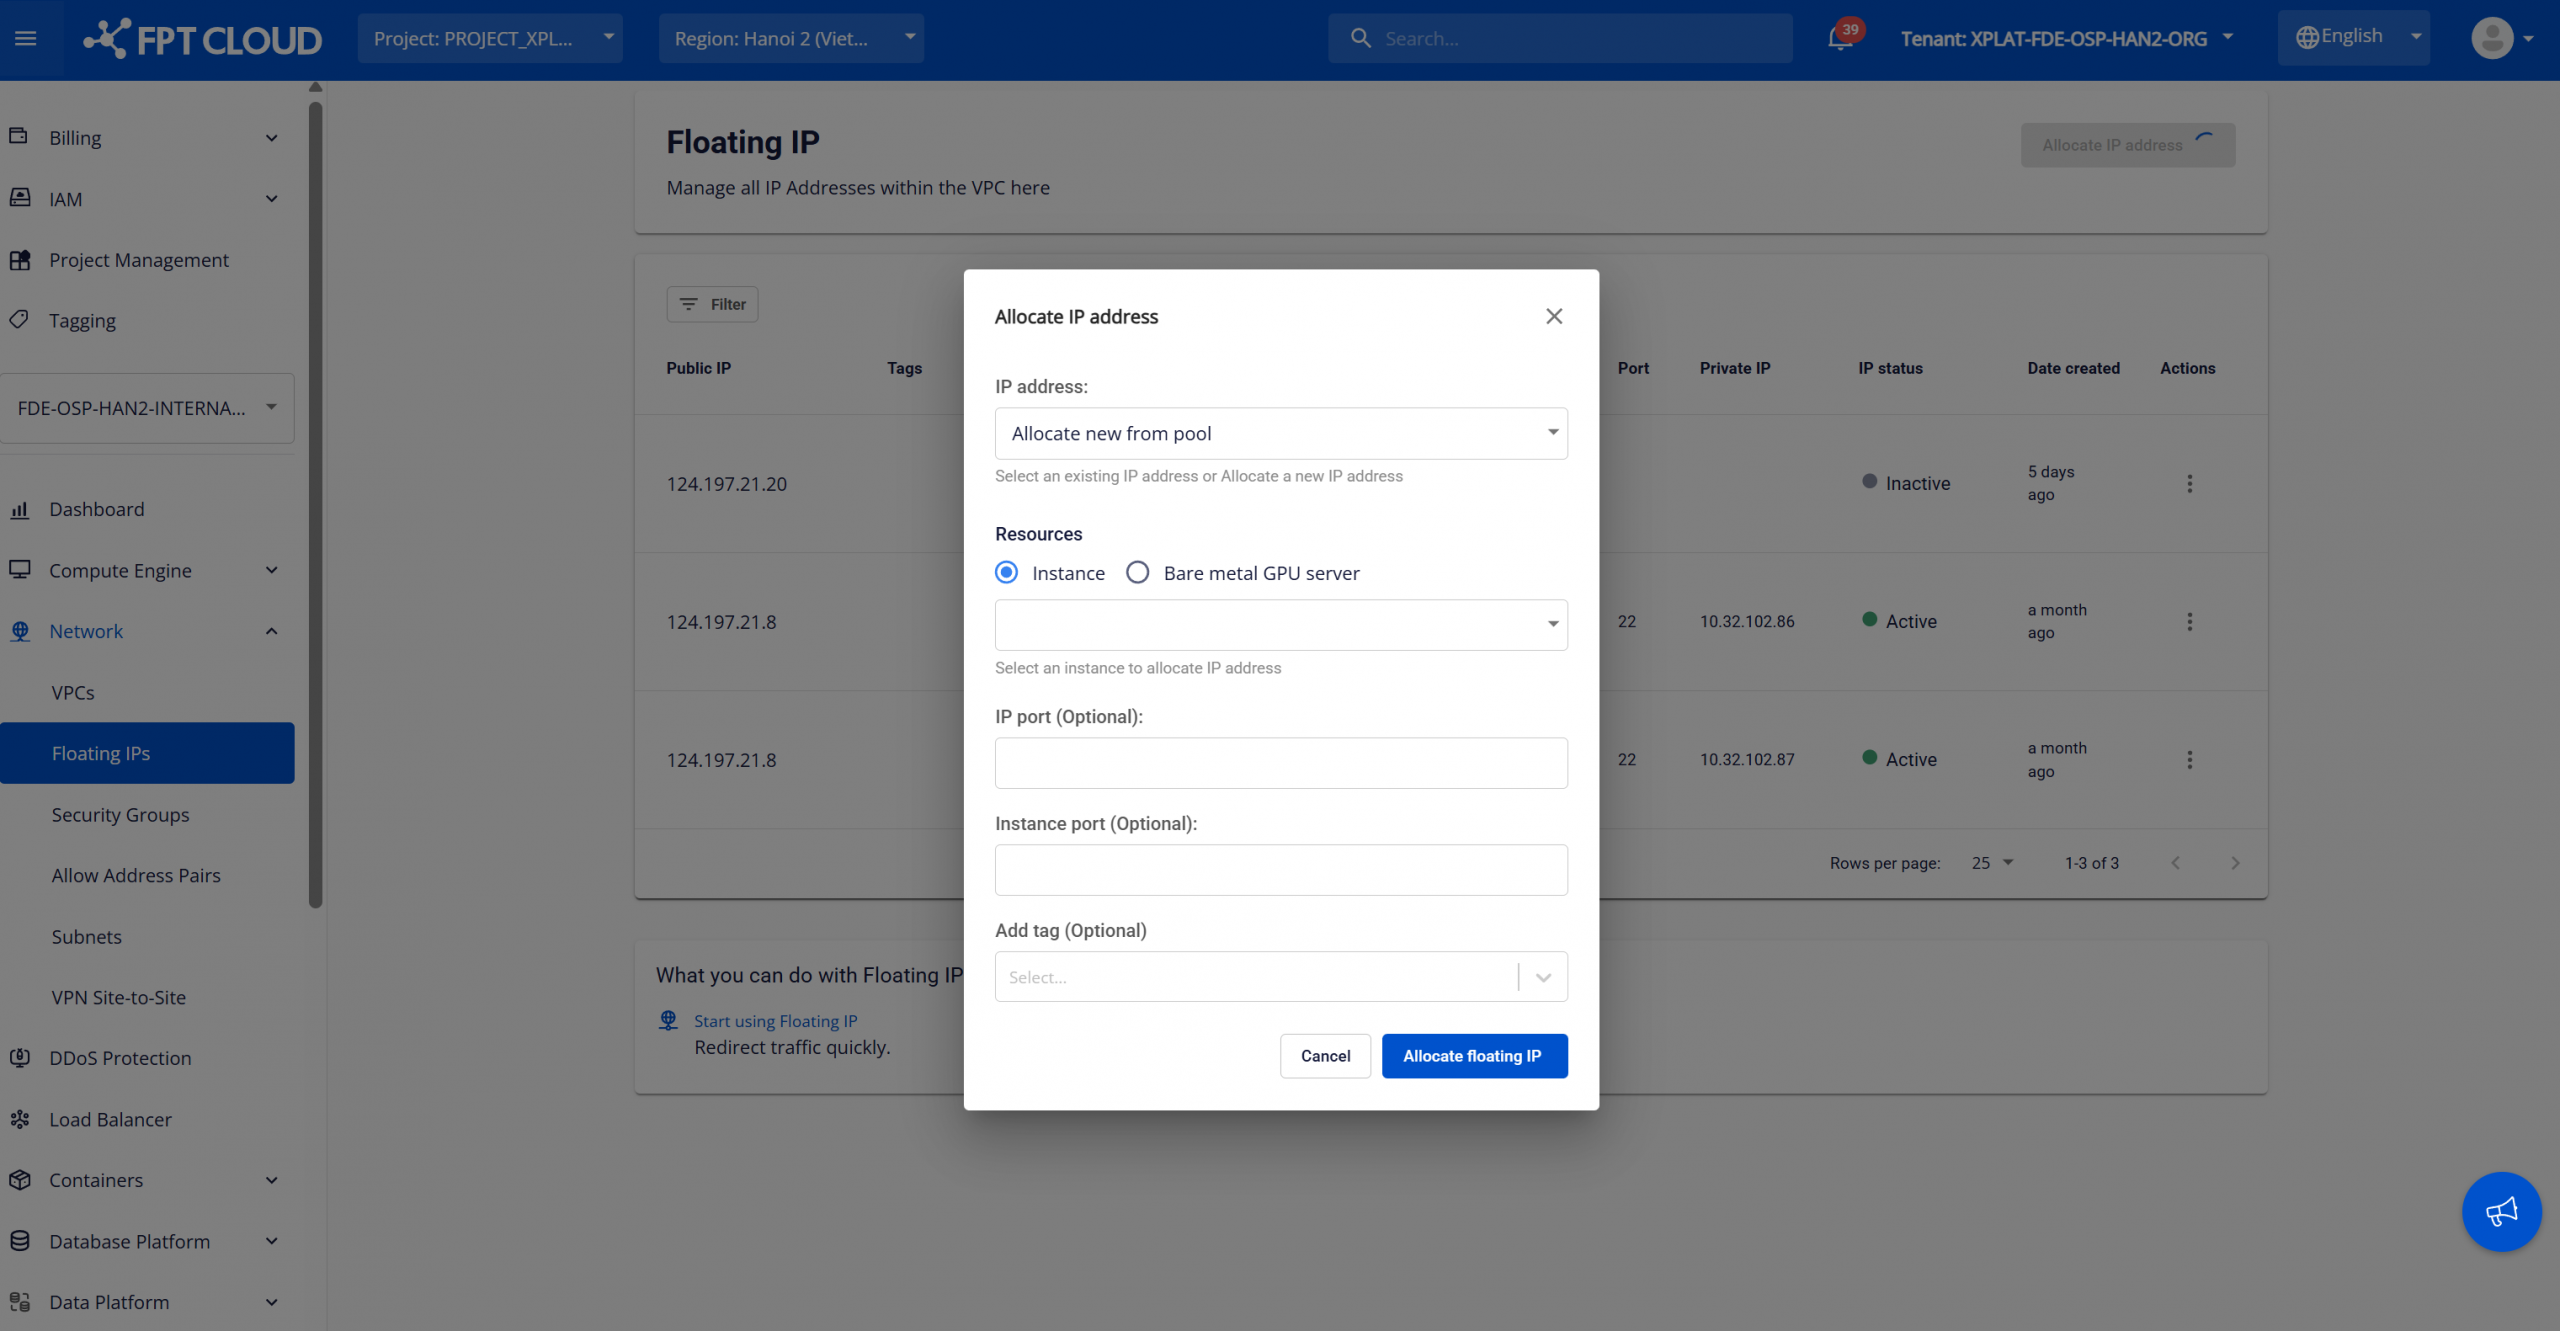
Enter the allocation information:
- IP address: Select the IP allocation method. There are two options:
- Allocate new from pool: The system automatically allocates a new public Floating IP from the available IP pool.
- Existing IP (if available): Select a previously allocated Floating IP from the list.
- Resources: Select the resource type to assign the Floating IP. For FPT Database Engine, select Resource type = Instance and choose the corresponding database instance from the list.
- IP Port (optional): Specify the public port if you configure port forwarding or specific NAT rules. Leave blank to use the default configuration.
- Instance port (optional): Specify the private port on the instance to map traffic from the public port. Leave blank to use the default configuration.
- Add tag (optional): Assign tags (key-value pairs) for classification, management, and tracking of the Floating IP during operations and auditing.
After completing the configuration, click Allocate floating IP to begin the allocation process. The new Floating IP will appear in the list with Active status and will be directly assigned to the selected database instance. You can use this Floating IP to connect to the database from outside if security rules and firewall policies permit.
Releasing a Floating IP:
When a Floating IP is no longer needed, you can release it by clicking Release IP for the corresponding address. Confirm the action in the warning dialog to complete.
Notes & troubleshooting:
- Ensure the instance's Security Group allows traffic on the required ports (e.g., SSH port 22, HTTP port 80, or the corresponding database port).
- If the Floating IP does not work as expected, check the security group inbound rules to ensure the required database ports are open.
Connecting to the database via a client
After granting network access (security group and floating IP), you can connect to the database using your preferred client tool (e.g., pgAdmin for PostgreSQL, MySQL Workbench for MySQL, etc.).
Step 1: Get connection information
Database connection information is displayed on the Database Overview screen in FPT Cloud Portal. To access this screen, open Database list, then select the database ID to view the detail page:
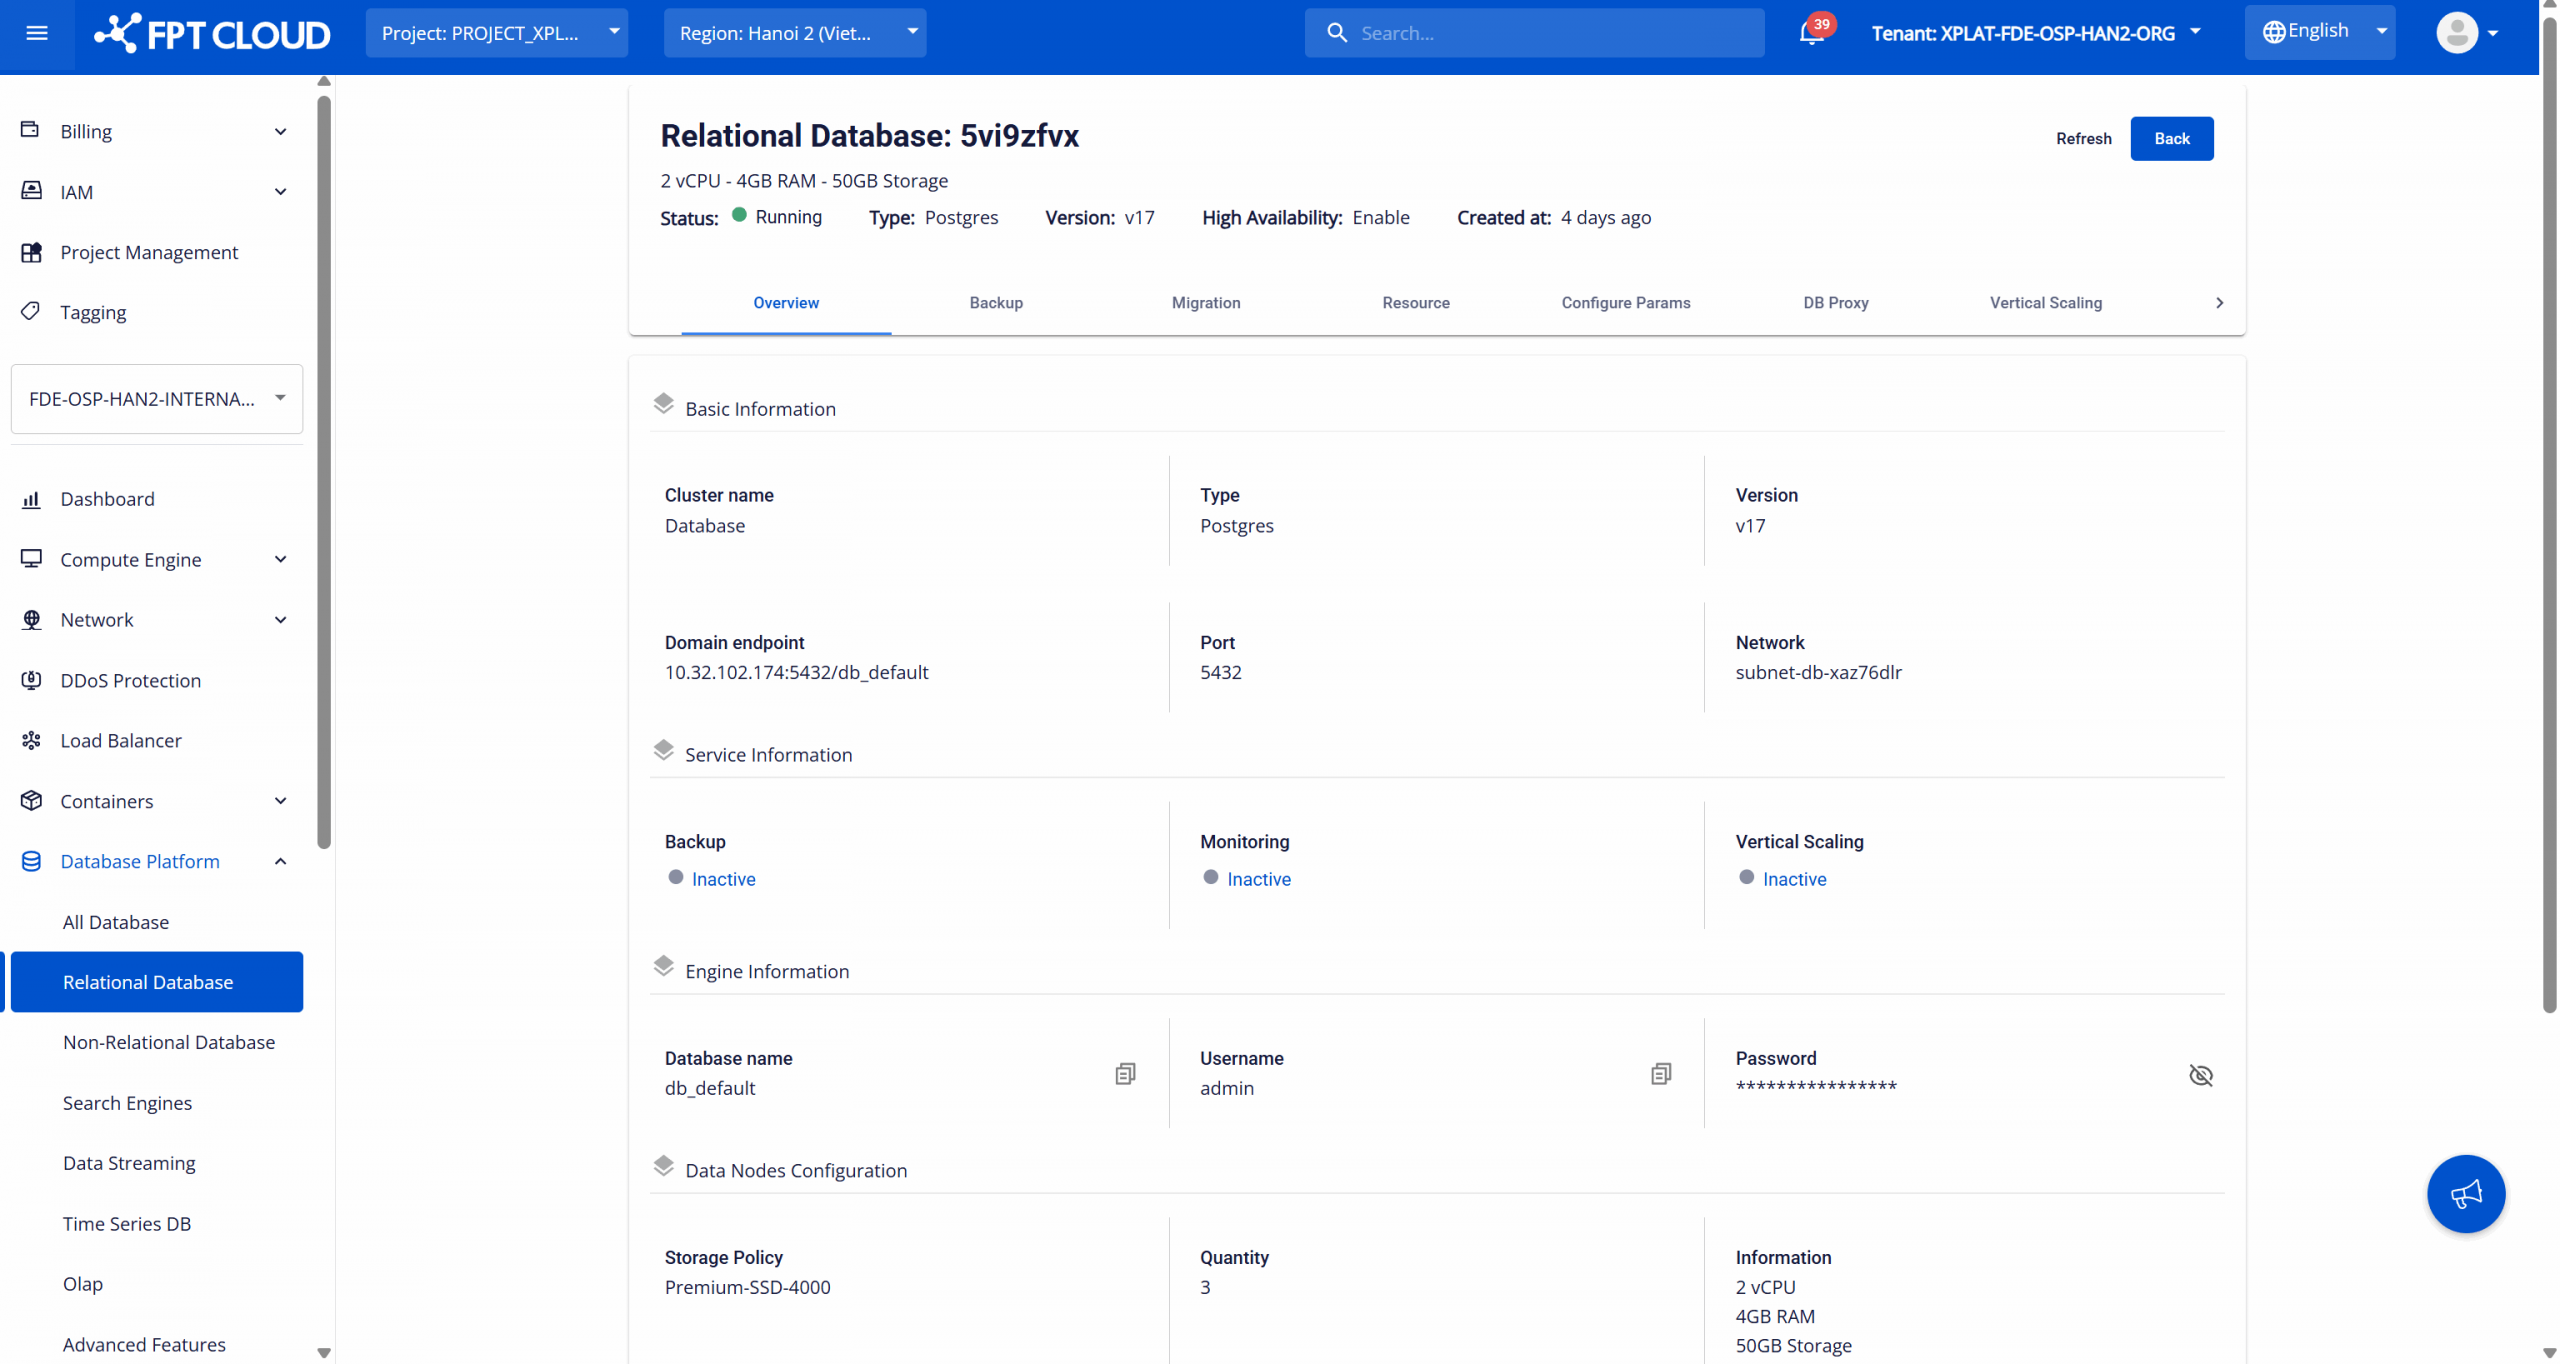
Use the following information to establish a connection to the database:
- Domain endpoint: The endpoint address used to connect to the database.
- Port: The service port that the database is listening on.
- Database name: The default database name created when the database was initialized.
- Username: The admin account name used to access the default database.
- Password: The password for the admin account.
Step 2: Establish the connection
You can connect to the database using one of the following methods:
- Connect using an administration tool: Use a database administration tool (e.g., pgAdmin, MySQL Workbench, SSMS), entering the endpoint, port, username, password, and database name to connect.
- Connect using the command line (CLI): Connect directly to the database from a terminal or application server using the CLI commands for each database engine.
- Connect from an application: Use the official database drivers for each engine and configure the appropriate connection string to connect from the application.
Once connected successfully, you will see the database structure and can execute queries directly from the client.
Note: Ensure that Security Group, firewall rules, and network policies allow connections to the database endpoint and port.